In 2008 I noted I was 1% more productive than 2007 with 101 posts. This year my statistics have plummeted, with just on 56 posts, a huge drop in "productivity". I wonder if it's anything to do with having a second kid?
Like last year I find it an interesting exercise to look back over my blog's statistics to work out the most popular pages for the year.
In 2009 the top 5 read blog posts were:
• Using multiple faces-config.xml files in JSF
• Configuring WebLogic Server Domain/Machine/Server instances with the JDeveloper 11g ADF installer
• Configuring a JDev 11g ADF Security app on standalone WLS against MS Active Directory
• SoapUI for web service testing
• JDev/ADF: How to log user login/logout/timeout to the database
Like 2008 the multi-faces-config.xml post wins out again, being hit just over 5500 times in 2009. Again this is probably indicative that there's a lot of JSF programmers out there beyond ADF programmers.
Of content that was written in 2009, the top 5 blog posts were:
• Configuring WebLogic Server Domain/Machine/Server instances with the JDeveloper 11g ADF installer
• SoapUI for web service testing
• Stress & load testing web applications (even ADF & Apex) using Apache JMeter
• JAX-WS Provider API based endpoints in JDev 11g
• Enabling SSL and disabling non-SSL under WLS 10.3
These statistics aren't overly representative of the 2009 results as some posts were written later in the year. However the first post received on 2700 hits in 2009, not a surprise as many developers jumped onto the JDev 11g bandwagon and discovered (at the time) configuring WLS needed some thought. I also not a bias towards web service posts, but again they go beyond the Oracle arena where there are plenty more developers.
Like last year I have no large plans for the blog in 2010. My blogging is mostly based around problems and solutions I work on for clients, while I reserve more comprehensive solutions for the SAGE Computing Services training courses and the odd paper I write for OTN or Oracle User Group magazines.
I might still though get a few extra posts in before the end of the year. But if not I'd like to wish readers a relaxing Christmas and New Years or whatever you celebrate on your part of the big round thing.
Wednesday, 16 December 2009
Upgrading WLS via Oracle Support maintenance patchsets
Recently I blogged about Upgrading WLS using the Oracle Smart Update utility. We discovered that while this utility will happily patch our developers' machines, we had h3lls own trouble trying to get it to work on our server. After much head scratching, gritting of teeth, yelling, begging and sobbing at our firewall administrators, without a solve, we decided a new approach was required.
As per Andreas Koop's comment in that original blog post, you can in fact run the Smart Update utility in offline mode, which implies you can download the patches and install them from the utility locally without directly connecting to the Oracle web services. However what I couldn't see was how to run the Maintenance Patch option in offline mode. Yet given the offline mode support it seemed reasonable that you could download a patchset from somewhere, and this post details where that's from.
Under Oracle Support's MOS and the HTML version you can click on the Patches and Updates tab.
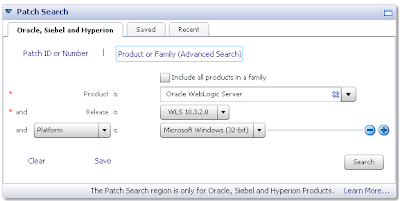
In MOS under the Patch Search box with the Oracle, Siebel and Hyperion tab selected, click on the Product or Family link. From there as per the following screenshot enter WebLogic Server as the product, pick whichever release you want to upgrade to (not from), and the platform:
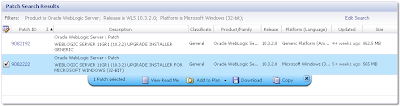
From here you can download the relevant patch:
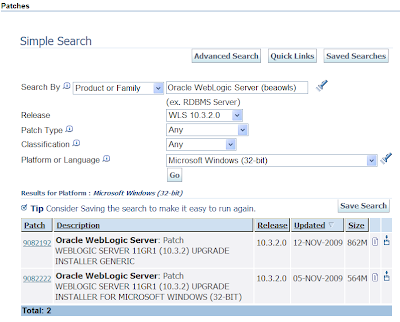
The MOS interface isn't ideal as you can't use download managers for speeding up the stupendous size of the patchsets. Alternatively the HTML version does. The following screenshot shows the equivalent search'n'results under HTML:
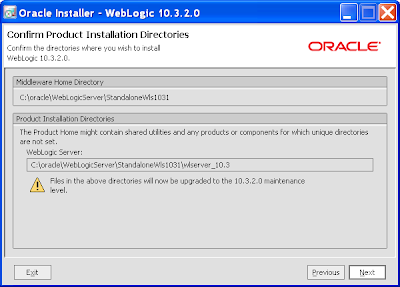
From the resulting downloaded zip, extract it and run the exe. This invokes the upgrade installer that looks similar to the normal WLS installer. The installer steps from then on are self explanatory, requiring you to pick the existing WLS home then proceeding with the installation.
As per Andreas Koop's comment in that original blog post, you can in fact run the Smart Update utility in offline mode, which implies you can download the patches and install them from the utility locally without directly connecting to the Oracle web services. However what I couldn't see was how to run the Maintenance Patch option in offline mode. Yet given the offline mode support it seemed reasonable that you could download a patchset from somewhere, and this post details where that's from.
Under Oracle Support's MOS and the HTML version you can click on the Patches and Updates tab.
In MOS under the Patch Search box with the Oracle, Siebel and Hyperion tab selected, click on the Product or Family link. From there as per the following screenshot enter WebLogic Server as the product, pick whichever release you want to upgrade to (not from), and the platform:

From here you can download the relevant patch:

The MOS interface isn't ideal as you can't use download managers for speeding up the stupendous size of the patchsets. Alternatively the HTML version does. The following screenshot shows the equivalent search'n'results under HTML:

From the resulting downloaded zip, extract it and run the exe. This invokes the upgrade installer that looks similar to the normal WLS installer. The installer steps from then on are self explanatory, requiring you to pick the existing WLS home then proceeding with the installation.
Monday, 14 December 2009
ADF UI Shell + ADF Security
This post covers off combining the new ADF UI Shell and ADF Security. Recently Oracle released the UI Shell based on the Oracle Dynamic Tabs Shell for JDeveloper 11g Release1 (aka PS1). I blogged about my initial research around the UI Shell here, and you can follow others' questions and answers on the ADF UI Patterns & Best Practices OTN forum.
It's important for me to note that both my original post and this post constitute my learnings, have not been tested in a production system, they could contain errors. As such your mileage may vary and it's important you do your own testing.
The UI Shell is an interesting concept in that it dictates your application will be composed of separate subsystems, each made up of a number of activities (aka. bounded task flows). The bounded task flows can in turn be shared by the subsystems.
What I wanted to consider in this post is what are the minimum requirements in applying ADF Security, or in other words, what permissions do we need to give to each of the design time parts in order to allow authenticated users to access the application. To discuss this I thought I'd base my example on the UI Shell demonstration application as detailed in the Oracle UI Shell Functional Pattern whitepaper.
In understanding how to apply ADF Security to the UI Shell example application we first need to identify all the moving parts that we need to apply security against:
1) In the UI Shell example application the application is divided into 3 subsystems, namely First, Second and Third. From a design time point of view each of these has an associated page First.jspx, Second.jspx and Third.jspx respectively.
2) In turn the First subsystem has a "welcoming" task flow comprised of a single page fragment called you.jsff. Potentially each subsystem can have its own welcoming task flow with page fragment, though in the example only one exists.
3) The First subsystem makes use of three activities (aka. bounded tasks flows using page fragments) called first, second and third (note the case difference, don't get these confused with the subsystem names which are initcapped), that in turn are simple bounded task flows using a single page fragment one.jsff, two.jsff and three.jsff respectively. The three activities are backed by task flow files first.xml, second.xml and third.xml.
With this in mind let setup a security scenario where we want to allow a user to access the First subsystem and all the associated activities, but not parts of the Second and Third subsystems.
The following steps describe the actions required in doing this:
1) You must first enable ADF Security for your application via the Application -> Secure -> Configure ADF Security menu option that invokes the Configure ADF Security wizard. As this wizard has been described in numerous other blogs I'll paraphase the options here:
Step 1 of 5
ADF Authentication and Authorisation
Step 2 of 5
Web Project: ViewController.jpr
Form-Based Authentication
Login Page: /login.html
Error Page: /error.html
Step 3 of 5
No Automatic Grants
Step 4 of 5
No options (Leave Redirect Upon Successful Authentication unselected)
Step 5 of 5
n/a
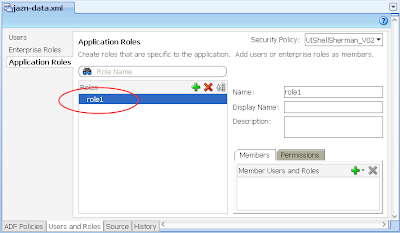
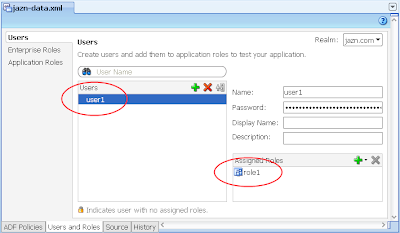
2) Via Application -> Secure -> Application Roles, configure a single Application Role "role1"
3) In the same jazn-data.xml editor, select the Users options on the left, then configure a single user "user1" and allocate them to "role1" Application Role you created in the last step.
---
What we need to from here is allocate basic access rights to the moving parts of the UI Shell that aren't specific to any subsystem. In other words the parts of the UI Shell that are shared by all subsystems regardless of the type of user.
You have a choice to make here. If you want your basic application to be available to any user regardless if they've authenticated (ie. logged in) or not, then in the following step you need to grant the "anonymous-role" privilege. Alternatively if you want your users to have to at least log in before accessing any part of the system, then you need to grant the "authenticated-role" privilege. If you're unfamiliar with these concepts please read the Oracle documentation. For this post I'll assume the "authenticated-role" privilege.
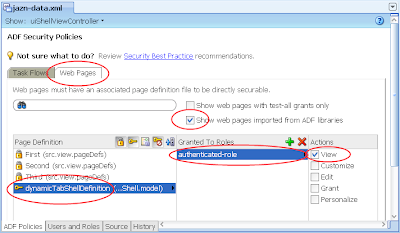
4) In the same jazn-data.xml editor, select the ADF Policies tab at the bottom. Select the Web Pages tab. Ensure the "Show web pages imported from ADF libraries" checkbox is selected. Under the Page Definitions table column select the dynamicTabShellDefinition option, then the green plus button in the "Granted to Roles" column, and select the authenticated-role role in the Select Role dialog:

The result in the jazn-data.xml will be:
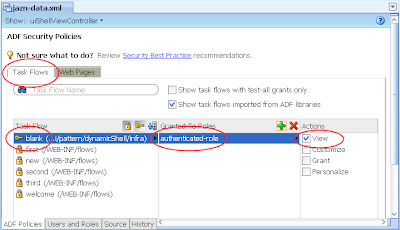
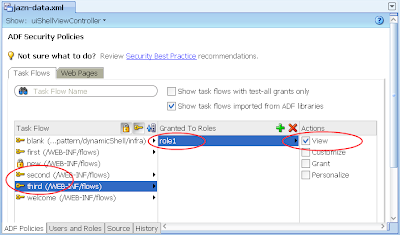
5) In the same jazn-data.xml editor with the ADF Policies tab still selected at the bottom, select the Tasks Flow tab. Ensure the "Show task flows imported from ADF libraries" checkbox is selected. Similar to the last step allocated the authenticated-role in the Select Role dialog to the "blank" task flow. The result:
---
From here we want to allocate the user1 with role1 privileges against the First subsystem.
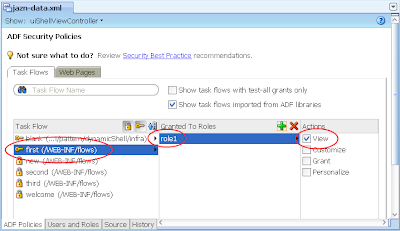
6) In the same jazn-data.xml editor with the ADF Policies tab and Tasks Flow tab open, allocate the role1 to the "first" task flow. The result:
7) Ditto, allocate role1 to the "welcome" task flow. The result:
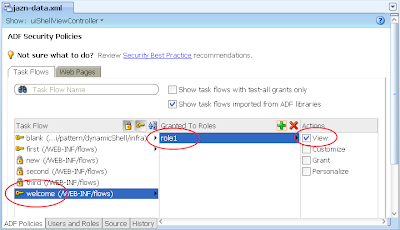
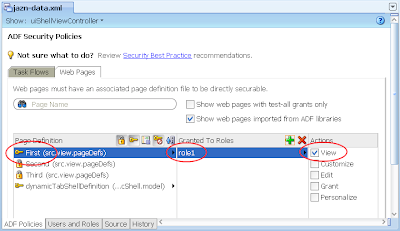
8) Switch back to the Web Pages tab, then allocate role1 to the First page:
---
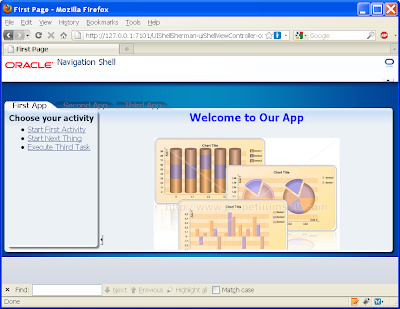
At this stage if you run your application, you'll note on accessing the First page the user will be hit with the login box straight away. A successful login lands on the First page showing the First subsystem.

If you click on one of the other main tabs such as Second App, the running page will return the following error message as expected as we haven't allocated user1 priviliges to the Second subsystem:
ADFC-0619: Authorization check failed: '/Second.jspx' 'VIEW'.
Ideally to stop this occurring we need to either disable or set the Second App tab's rendered property to false, through the following EL expression:
#{!securityContext.userInRole['role2']}
The result:
You'll need to make this change to every tab into every subsystem's page (First.jspx, Second.jspx, Third.jspx).
---
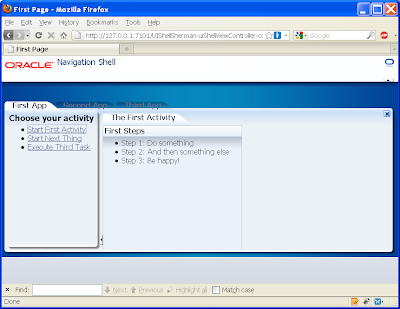
If we now open the first activity in the First subsystem page we get:
Yet if we open the second activity we get the following empty content:
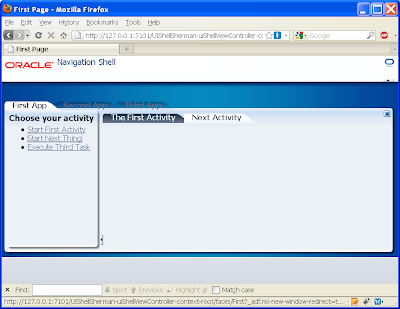
This is to be expected as we haven't allocated the second.xml (or even the third.xml) to the role1 privilege. As back in step 6, allocate role1 against these under the jaxn-data.xml editor, ADF policies tab, Task Flow tab:
Alternatively if you don't want these activities available to role1, instead change the commandLink's to disable or un-render properties as per the EL securityContext example above.
--
In conclusion we see the UI Shell works pretty seamlessly with ADF Security, with the small caveat that you need to know which parts of the UI Shell to grant privileges to all users/roles.
It's important for me to note that both my original post and this post constitute my learnings, have not been tested in a production system, they could contain errors. As such your mileage may vary and it's important you do your own testing.
The UI Shell is an interesting concept in that it dictates your application will be composed of separate subsystems, each made up of a number of activities (aka. bounded task flows). The bounded task flows can in turn be shared by the subsystems.
What I wanted to consider in this post is what are the minimum requirements in applying ADF Security, or in other words, what permissions do we need to give to each of the design time parts in order to allow authenticated users to access the application. To discuss this I thought I'd base my example on the UI Shell demonstration application as detailed in the Oracle UI Shell Functional Pattern whitepaper.
In understanding how to apply ADF Security to the UI Shell example application we first need to identify all the moving parts that we need to apply security against:
1) In the UI Shell example application the application is divided into 3 subsystems, namely First, Second and Third. From a design time point of view each of these has an associated page First.jspx, Second.jspx and Third.jspx respectively.
2) In turn the First subsystem has a "welcoming" task flow comprised of a single page fragment called you.jsff. Potentially each subsystem can have its own welcoming task flow with page fragment, though in the example only one exists.
3) The First subsystem makes use of three activities (aka. bounded tasks flows using page fragments) called first, second and third (note the case difference, don't get these confused with the subsystem names which are initcapped), that in turn are simple bounded task flows using a single page fragment one.jsff, two.jsff and three.jsff respectively. The three activities are backed by task flow files first.xml, second.xml and third.xml.
With this in mind let setup a security scenario where we want to allow a user to access the First subsystem and all the associated activities, but not parts of the Second and Third subsystems.
The following steps describe the actions required in doing this:
1) You must first enable ADF Security for your application via the Application -> Secure -> Configure ADF Security menu option that invokes the Configure ADF Security wizard. As this wizard has been described in numerous other blogs I'll paraphase the options here:
Step 1 of 5
ADF Authentication and Authorisation
Step 2 of 5
Web Project: ViewController.jpr
Form-Based Authentication
Login Page: /login.html
Error Page: /error.html
Step 3 of 5
No Automatic Grants
Step 4 of 5
No options (Leave Redirect Upon Successful Authentication unselected)
Step 5 of 5
n/a
2) Via Application -> Secure -> Application Roles, configure a single Application Role "role1"

3) In the same jazn-data.xml editor, select the Users options on the left, then configure a single user "user1" and allocate them to "role1" Application Role you created in the last step.

---
What we need to from here is allocate basic access rights to the moving parts of the UI Shell that aren't specific to any subsystem. In other words the parts of the UI Shell that are shared by all subsystems regardless of the type of user.
You have a choice to make here. If you want your basic application to be available to any user regardless if they've authenticated (ie. logged in) or not, then in the following step you need to grant the "anonymous-role" privilege. Alternatively if you want your users to have to at least log in before accessing any part of the system, then you need to grant the "authenticated-role" privilege. If you're unfamiliar with these concepts please read the Oracle documentation. For this post I'll assume the "authenticated-role" privilege.
4) In the same jazn-data.xml editor, select the ADF Policies tab at the bottom. Select the Web Pages tab. Ensure the "Show web pages imported from ADF libraries" checkbox is selected. Under the Page Definitions table column select the dynamicTabShellDefinition option, then the green plus button in the "Granted to Roles" column, and select the authenticated-role role in the Select Role dialog:

The result in the jazn-data.xml will be:

5) In the same jazn-data.xml editor with the ADF Policies tab still selected at the bottom, select the Tasks Flow tab. Ensure the "Show task flows imported from ADF libraries" checkbox is selected. Similar to the last step allocated the authenticated-role in the Select Role dialog to the "blank" task flow. The result:

---
From here we want to allocate the user1 with role1 privileges against the First subsystem.
6) In the same jazn-data.xml editor with the ADF Policies tab and Tasks Flow tab open, allocate the role1 to the "first" task flow. The result:

7) Ditto, allocate role1 to the "welcome" task flow. The result:

8) Switch back to the Web Pages tab, then allocate role1 to the First page:

---
At this stage if you run your application, you'll note on accessing the First page the user will be hit with the login box straight away. A successful login lands on the First page showing the First subsystem.

If you click on one of the other main tabs such as Second App, the running page will return the following error message as expected as we haven't allocated user1 priviliges to the Second subsystem:
ADFC-0619: Authorization check failed: '/Second.jspx' 'VIEW'.
Ideally to stop this occurring we need to either disable or set the Second App tab's rendered property to false, through the following EL expression:
#{!securityContext.userInRole['role2']}
The result:

You'll need to make this change to every tab into every subsystem's page (First.jspx, Second.jspx, Third.jspx).
---
If we now open the first activity in the First subsystem page we get:

Yet if we open the second activity we get the following empty content:

This is to be expected as we haven't allocated the second.xml (or even the third.xml) to the role1 privilege. As back in step 6, allocate role1 against these under the jaxn-data.xml editor, ADF policies tab, Task Flow tab:

Alternatively if you don't want these activities available to role1, instead change the commandLink's to disable or un-render properties as per the EL securityContext example above.
--
In conclusion we see the UI Shell works pretty seamlessly with ADF Security, with the small caveat that you need to know which parts of the UI Shell to grant privileges to all users/roles.
Wednesday, 2 December 2009
Upgrading WLS using the Oracle Smart Update utility
Oracle provides the Smart Update utility to upgrade WebLogic Server installations between versions, or to apply specific patches applied by Oracle Support. This post considers upgrading a 10.3.1 server to 10.3.2, not applying patches. As usual your mileage may vary so be diligent in checking these instructions beforehand.
The Oracle Smart Update utility is documented here.
The general steps to run the Oracle Smart Update utility and upgrade the server are as follows:
1) Ensure your WLS and any managed servers are not running. In turn it would be a good idea to backup your server before running this procedure, in particular if it's a production server.
2) (For whatever reason I couldn't invoke the following utility from Windows Explorer, so I had to invoke it via the command line)
2.1) Under Windows open the command prompt at <wls_home>\utils\bsu
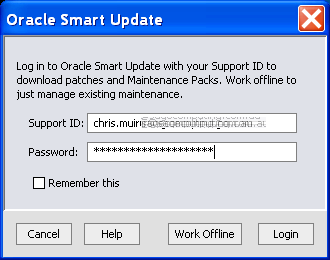
2.2) Execute the bsu.cmd. This displays the Oracle Smart Update dialog to enter your Oracle Support user ID and password:
3) Assuming your login details are correct you'll be presented with the Oracle Smart Update dialog. This can take some time to open as the utility scans your existing WLS patches
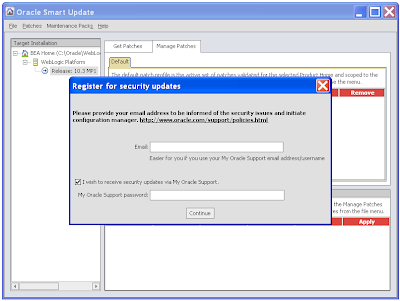
4) You may be prompted to "Register for security updates", take your choice, be annoyingly nagged by Oracle, or miss applying security patches in the future:
5) The end result:
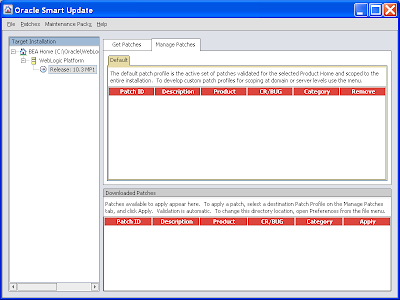
6) The Target Installation tree on the left hand side shows you the WLS servers the patch engine will work with. We're not interested in the content on the right. Presumably it includes one off patches to apply as supplied by Oracle Support, or hot security fixes applying to all WLS installations. I've yet to see one of these so can't comment on what you'll actually see.
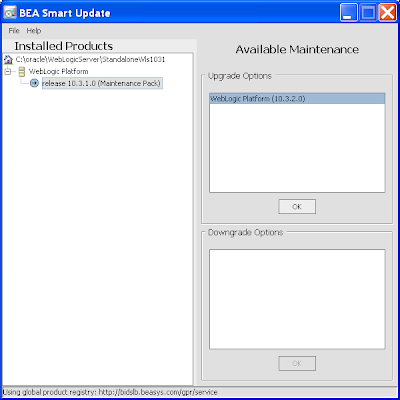
7) To upgrade your WLS between versions you apply a "Maintenance Pack". Click on the same named menu option followed by the sub-option Update. This launches the BEA Smart Update dialog. On selecting your existing WLS server in the left tree, you'll see the option to apply the Upgrade Option in the right, in this case specifically WebLogic Platform (10.3.2.0):
The Oracle documentation for Maintenance Pack installations is here.
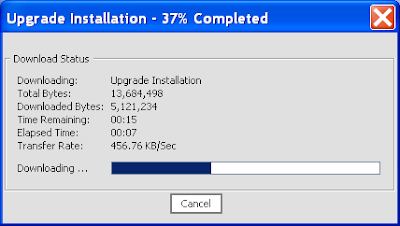
8) Selecting the Ok button will display a download dialog:
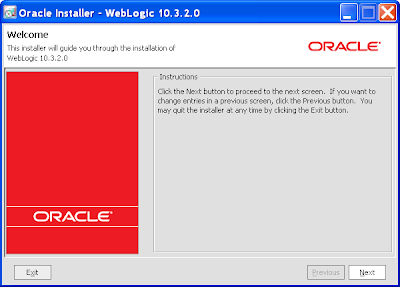
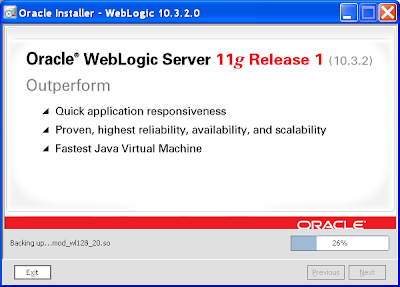
9) On the file downloading you'll be presented with the Oracle Installer for WebLogic 10.3.2.0:
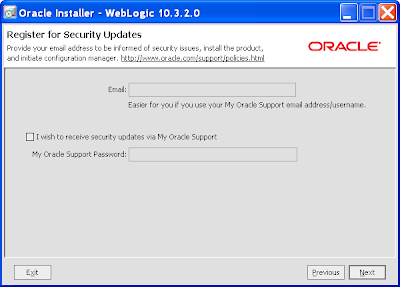
10) Again you'll get a chance to "Register for security updates". Be brave and skip it:
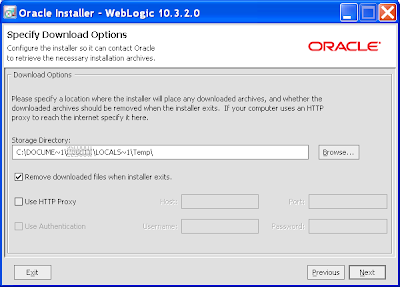
11) The next page allows you to specify the download location of any additional files, whether the files should be removed after installation, and the HTTP Proxy options to get through your firewall including username and password:
12) You'll then get another download screen and a chance for a coffee or 2 (make that 4):
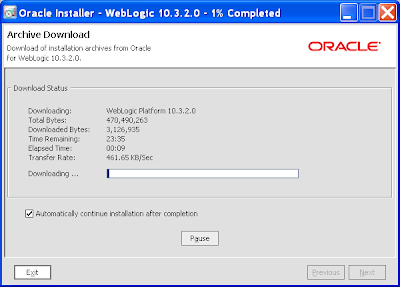
If the downloads fails half way through, don't give up as the download utility supports resumes, just wait for it to timeout and then ask it to continue downloading.
13) You'll then be given one last chance to back out:
14) After which there's no backing out:
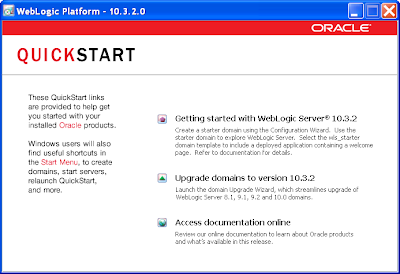
15) Just click Done on the final page. If the QuickStart dialog shows, close it:
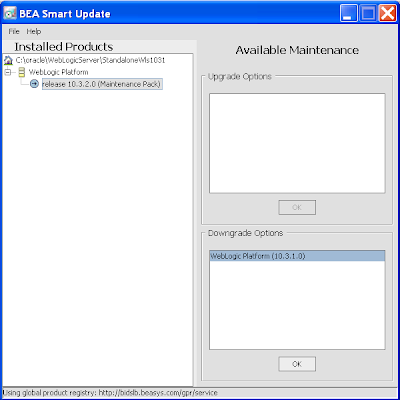
16) In turn the BEA Smart Upgrade dialog will also show detailing the new 10.3.2 upgrade. You'll note in the lower part of the right window, you can downgrade from 10.3.2 to 10.3.1 if necessary. You can close this dialog:
17) Returning to the Oracle Smart Update window it'll misreport the current version which you can ignore.
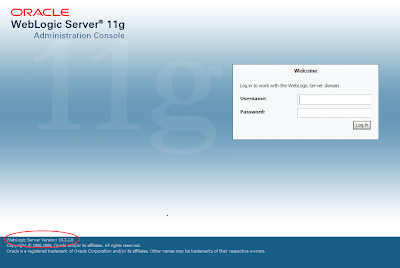
18) To verify the install the easiest thing is to start your managed servers and then access the console login. At the bottom of the page you'll see the server version:
19) It's probably worth investigating the server logs to see if any unexpected exceptions have been thrown.
The Oracle Smart Update utility is documented here.
The general steps to run the Oracle Smart Update utility and upgrade the server are as follows:
1) Ensure your WLS and any managed servers are not running. In turn it would be a good idea to backup your server before running this procedure, in particular if it's a production server.
2) (For whatever reason I couldn't invoke the following utility from Windows Explorer, so I had to invoke it via the command line)
2.1) Under Windows open the command prompt at <wls_home>\utils\bsu
2.2) Execute the bsu.cmd. This displays the Oracle Smart Update dialog to enter your Oracle Support user ID and password:

3) Assuming your login details are correct you'll be presented with the Oracle Smart Update dialog. This can take some time to open as the utility scans your existing WLS patches
4) You may be prompted to "Register for security updates", take your choice, be annoyingly nagged by Oracle, or miss applying security patches in the future:

5) The end result:

6) The Target Installation tree on the left hand side shows you the WLS servers the patch engine will work with. We're not interested in the content on the right. Presumably it includes one off patches to apply as supplied by Oracle Support, or hot security fixes applying to all WLS installations. I've yet to see one of these so can't comment on what you'll actually see.
7) To upgrade your WLS between versions you apply a "Maintenance Pack". Click on the same named menu option followed by the sub-option Update. This launches the BEA Smart Update dialog. On selecting your existing WLS server in the left tree, you'll see the option to apply the Upgrade Option in the right, in this case specifically WebLogic Platform (10.3.2.0):

The Oracle documentation for Maintenance Pack installations is here.
8) Selecting the Ok button will display a download dialog:

9) On the file downloading you'll be presented with the Oracle Installer for WebLogic 10.3.2.0:

10) Again you'll get a chance to "Register for security updates". Be brave and skip it:

11) The next page allows you to specify the download location of any additional files, whether the files should be removed after installation, and the HTTP Proxy options to get through your firewall including username and password:

12) You'll then get another download screen and a chance for a coffee or 2 (make that 4):

If the downloads fails half way through, don't give up as the download utility supports resumes, just wait for it to timeout and then ask it to continue downloading.
13) You'll then be given one last chance to back out:

14) After which there's no backing out:

15) Just click Done on the final page. If the QuickStart dialog shows, close it:

16) In turn the BEA Smart Upgrade dialog will also show detailing the new 10.3.2 upgrade. You'll note in the lower part of the right window, you can downgrade from 10.3.2 to 10.3.1 if necessary. You can close this dialog:

17) Returning to the Oracle Smart Update window it'll misreport the current version which you can ignore.
18) To verify the install the easiest thing is to start your managed servers and then access the console login. At the bottom of the page you'll see the server version:

19) It's probably worth investigating the server logs to see if any unexpected exceptions have been thrown.
Monday, 30 November 2009
ADF 11gR1 – UI Shell – Oracle Dynamic Tabs Shell
In the latest release of JDeveloper, specifically 11.1.1.2.0 also known as 11g Release 1 also known as Patch Set 1 also known as 11g build 5536 also known as the Shepherd build (cough cough Oracle), Oracle has included a new built in page template known as the "Oracle Dynamic Tabs Shell". This template is part of Oracle's ADF Functional Patterns and Best Practices efforts, also referred to as the "UI Shell". Complete documentation is available here. I'll leave readers unfamiliar with the UI Shell to read Oracle's documentation to understand the basics.
With my current client we're happy with the inclusion of this new UI Shell and we can actively see ourselves using it in the near future. What I wanted to document is my own thoughts and research which may be of use to others, and I hope to further the discussion on the ADF EMG. Note as usual your mileage may vary so take time out to check the facts listed here:
1) The Create JSF Page dialog presents the "Oracle Dynamic Tabs Shell" page template option:

2) The template and its supporting classes are installed in <jdev_home>/jdeveloper/adfv/jlib/oracle-page-templates-ext.jar, though the JDev IDE takes care of importing the template and classes/libraries into your project for you once selected in the Create JSF Page dialog. As the following picture shows an additional library Oracle Extended Page Templates is added to your project:
 Side note: Steve Muench has blogged the location of the UI Shell template and supporting classes as a separate download here. This will allow you to take the default UI Shell template and customise to your needs if required. See further points below for why this may be necessary.
2) Our technical team was already getting bogged down in "discussions" of "standard" web page layouts versus RIA layouts. The technical team knows the standard web page layouts weren't suited to RIA applications, but it was hard to argue our case without actually creating a RIA layout. In turn creating a RIA layout that we were happy with was going to take some time, and we're building applications now. With the UI Shell we can short cut the layout "discussions", say this is what Oracle's provided us, it works well and this is what we'll use, allowing us to focus on the more important matter of hand and that's writing the ADF solution for the business.
3) Our overall application is made up of several subsystems (think Oracle Apps with HR, Procurement, Payroll etc). Within the UI Shell the globalTabs facet provides an ideal location to list the subsystems allowing the user to switch between each module:
 4) Each subsystem gets its own page based on the template, as in hr.jspx, procurement.jspx and payroll.jspx based on our example.
5) The rest of the application is made up of a number "Activities" that in essence are bounded task flows using page fragments, or in other words the business processes of your application. Each subsystem is free to make use of as many bounded task flows as it sees fit, and in addition a bounded task flow can be used (shared) by many of the subsystem pages.
6) As per the previous point, if you're using the default UI Shell provided through JDeveloper rather than downloading the UI Shell as per Steve Muench's blog above, and you wish to have a common element in every page using the template, you'll need to code them in every page which isn't ideal. The solution is to download Oracle's template and customise it within your own application (or possibly create a number of declarative page components for repetitive content, though this will still require you to load each page component in each page based on the UI Shell template).
7) A key feature of the UI Shell as described in its other name "Oracle Dynamic Tabs Shell" is it shows under each subsystem how to launch a bounded task flow (aka Activity) one or many times:
 This may not be ideal for every application, but my current client has a scenario in an existing Oracle Forms application where users open up to 4 sessions. While we're not sure on building an ADF equivalent with a chance to redesign the users' workflow will they still need to do this, if they do we're envisaging that each session can now be as a separate UI Shell Activity under the subsystem page.
8) As discussed in the following ADF EMG thread the UI Shell makes a great addition to the "Master JDev Application Workspace" proposed by Todd Hill bringing a number of composite ADF bounded task flows together.
9) The demonstration UI Shell application shows a basic mechanism of stopping a user leaving an activity once they've made "it dirty". The analogy to this is in the JDev IDE when the user changes the contents of a source file, the tab control title font becomes italic and the user is warned/prompted to save changes if they attempt to close the tab without saving.
Currently this feature should be considered a demonstration feature only as in the downloadable UI Shell demonstration application it has a number of limitations (it is a demo after all). In particular the isDirty() check is only done within a subsystem's activities. Clicking on a different subsystem tab/page doesn't invoke the isDirty() check with the appropriate warning dialog. It would be my assumption that this check would need to be coded in each specific application, reusing the isDirty() facilities provided.
10) For the logoImagePath attribute you can specify the path of the UI Shell log image, but not the size. In the turn the layout tends to assume a horizontal logo. If corporate branding is important to your organisation and they have a long vertical logo, good luck.
11) The default UI Shell has no consideration of security. For instance what subsystems are available under the globalTabs for the current user is your responsibility
12) The overall template does waste some vertical screen real-estate:
 See annotations A, B and C.
A can be trimmed by setting the globalSplitterPosition attribute. At this time it doesn't look like B and C can be set in the default UI Shell. Ideally we'd want something like this:
 13) The overall template is extremely small – only 74k – wow, Oracle can create something that doesn't take up an entire CD! ;-)
14) I note in the source code downloadable from Steve Muench's blog that there are a few comments that the implementation will change dependent on later updates to the ADF component set presumably available in later JDev releases (ie. see the TabContext.java REMOVE_ME_WHEN_NAVPANE_SUPPORTS_STAMPING comment).
This implies the default functionality of the UI Shell could change in the future which could have issues for your existing applications based on the UI Shell and therefore your regression testing and user experience. It may be necessary to source the UI Shell code and baseline in your code repository rather than being subjected to changes in functionality on upgrading to future JDev releases.
15) As per the UI Shell whitepaper, the 7 zillion steps to reproduce the demonstration UI Shell application do look daunting. However if you're familiar with JDev, page templates and constructing JSF pages it only takes about 20-30 minutes to run through most of the steps. In fact most steps are just setting up dummy task flows and page fragments to show some content within the produced template, nothing really to do with the template itself.
16) You'll need to remind users/analysts/managers etc that what the UI Shell gives in preconfigured layouts, saving developers time and boosting productivity, it takes away in customizable layout of the screen. This is a common point of contention in component based frameworks where a super component gives a large array of features, but the component works as the component works and cannot be easily customised without headache.
Saturday, 14 November 2009
ADF EMG goes international - UKOUG style
I'm happy to say that the ADF Enterprise Methodology Group is running its first UKOUG presentation this year at their annual technology conference in Birmingham November 30th-December 2nd. This is a pretty exciting development for us, as this will be the first ADF EMG session run outside of the USA!
My colleague in ADF crime Simon Haslam, who organised and ran our OOW sessions this year, invites anybody who is interested in ADF and wants to talk with other users to attend. At OOW we had the rather pleasing experience of several ADF "production" system demonstrations which was pretty cool, and hopefully at the UKOUG we can get some of you to talk about your ADF experiences too.
Unfortunately I'm just on 14590.82kms away (9066.56 miles for our UK friends) and wont be able to make it. If only it was a couple clicks closer, oh, and not across several oceans & continents, and a tad warmer too.
Thursday, 12 November 2009
ADF BC Groovy – showing old values along with new.
A common requirement in databound applications is to allow the user to view changes before they commit them to the database, showing the user both the original-old value along with the new. This gives users a chance to review their changes visually by comparing the old and new.
For an updated record that has yet been committed to the database, ADF BC stores both the old and new value. Among other reasons ADF BC does this, is it allows the user to cancel any changes, and rather than having to fetch the original value back from the database, ADF BC just retrieves the old value it has cached without a roundtrip to the database.
This cache gives us the ability to solve our original requirements as the ADF BC framework exposes methods to fetch both new and old non committed values from the Entity Object (EO). To fetch the new current value we call the associated accessor such as getPosition() or getName() that was automatically created by the framework in our EntityImpl. To get the old value we use the getPostedAttribute() method passing in the index of the field we wish to fetch.
In JDeveloper 11g through its introduction of Groovy expressions, it's very simple to expose the old value through the Entity Objects:
1) In your required EO create a transient attribute. For example if we want to show the old values for the Position attribute of our EO, we could create a new transient attribute named OldPosition.
2) Ensure the "Persistent" and "Derived from SQL Expression" properties are turned off for the new transient attribute.
3) Set the "Value Type" to Expression and enter the following Groovy expression into the Value field:
adf.object.getPostedAttribute(adf.object.getAttributeIndexOf(model.EmployeesImpl.POSITION))
Note the call to the getPostedAttribute() method, passing in the index of the Position field that it requires.
If the Groovy syntax isn't familiar to you in JDeveloper 11g consult Grant Ronald's Introduction to Groovy.
A bad steer here maybe to try and use ADF Groovy's oldValue and newValue methods. Unfortunately these are only available for Groovy expressions in EO Declarative Validators, not in transient attribute.

4) Expose the attribute through the associated View Objects (VO) if necessary.
At runtime you'll note that initially the OldPosition field shows what's in the Position field. When you change the Position field's value, the OldPosition remains at the pre-cached value. Finally on committing the changes to the database, the OldPosition value is overwritten with the new Position value.
Wednesday, 4 November 2009
Just how famous can one man get?
Between OOW and the AUSOUG conferences it's a bit of a slow blogging time for me, while presentation preparation takes priority. With a little spare time I thought I'd share this photo of some recent booty (and before you get all excited, that's arrrrgh "Pirate" booty, not the other sort):

On the right my coveted Oracle ACE Director of the Year award from Oracle Magazine. In the middle Duke, thrown from James Gosling himself at his Oracle Develop OOW session. And on the left my cherished SAGE Computing Services award.
If the writing is a little hard to read, it says:
Sage Computing Services' own Chris "ACE Director of the Year" Muir - "How famous can one man get" Award - For excessive hard work blogging and general geeky behaviour.
And to think, I thought nobody noticed ;-)
Tuesday, 3 November 2009
ODTUG down under – more ACEs than a pack of cards

Regular readers already know that ODTUG in conjunction with Oracle Technology Network has invited a number of Oracle ACEs and ACE Directors to present down under. ODTUG has teamed with AUSOUG to give these world recognized presenters (in fact in all cases world award winning speakers) full day slots at the conference that starts next week:
Tim Hall
Lucas Jellema
Peter Koletzke
Connor McDonald
Penny Cookson
Unusually for these presentations, rather than a 45m technical hit, these speakers will be running full day slots, meaning it's a mini training day increasing your value from the conference.
The Perth conference starts next week November 10th & llth, and the Melbourne conference follows 16th & 17th of November. You don't have much time to book so hit the AUSOUG website now for instructions on how to buy tickets.
In addition I'll be presenting my two presentations fresh from OOW09:
SOA Lite: A taste of SOA with a smidgen of Web Services
Oracle JDeveloper 11g JAX-WS Web Services: As easy as 1-2-3: XSD, WSDL, Generate!
...but given these other great speakers are in town, I expect me and my Mum in mine :-(
AUSOUG charges considerably under industry rates for the conference series per delegate, and there are rumours this will be the last year at such cheap rates, so make effort to grab tickets now.
Remember to support your user group like it supports you.
Tuesday, 27 October 2009
Part II - Working with WLS 10.3.1 SQLAuthenticator password algorithms
In the previous post we looked at how to configure the SQLAuthenticator password encryption options. Among other encryption algorithms we discovered that on creating a user from the WLS console, WLS would create the associated user in a database table with password "password" encrypted to:
{SHA-1}W6ph5Mm5Pz8GgiULbPgzG37mj9g=
...when the SHA-1 option was set.
As was mentioned in the previous post, as the database table with its users and passwords may be shared by non-WLS based applications, it's important that those systems can encrypt passwords and compare them to the WLS result. In other words, in the example above, given that WLS generated a SHA-1 encrypted password, if another system uses the same SHA-1 algorithm will it generate the same encrypted password allowing it to compare the database SHA-1 encrypted password against the SHA-1 encrypted password it has?
In order to check we can get the same encrypted results, we'll investigate generating a SHA-1 password using the Oracle database's encryption facilities (so in this case the database acts as the other subsystem), comparing the database's encrypted SHA-1 password to that of WLS.
The following solution owes thanks to Sean at Oracle Support who very patiently led me in the right direction with my findings.
dbms_crypto
Oracle database fans will be familiar with the dbms_crypto package that provides encryption support.
dbms_crypto allows us to generate an encrypted password that we can compare to the WLS result. From table 34-1 of the dbms_crypto link, we note that dbms_crypto supports the following one-way hash algorithms: SHA-1, MD4 and MD5. As WLS via the JCE extensions (see the previous post) supports SHA-1, MD2 and MD5, it's fortunate we picked SHA-1 for this example.
The following anonymous PL/SQL block shows an example using the dbms_crypto package hash function with SHA-1 to produce an encrypted result:
The missing bit of information (that I haven't found documented) is that WLS after encrypting the plaintext password, as confirmed by Oracle Support, WLS then converts the output to base 64. In the case of the dbms_crypto hash function, it converts the encrypted result to Hex. In order to get the same result you need to convert the Hex output to base 64.
There's a number of different ways to do this. One is to use a Java routine in the database, converting the dbms_crypto Hex result to a byte array, then byte array to base 64. A suitable algorithm would be:
The end result is: W6ph5Mm5Pz8GgiULbPgzG37mj9g= ... finally matching what WLS wrote to the database (missing the algorithm prefix of course).
Conclusion
Why the WebLogic Server's SQLAuthenticator can make use of different encryption algorithm when writing to the database, it's important to ensure that the results are expected and understood and can be used by other subsystems.
{SHA-1}W6ph5Mm5Pz8GgiULbPgzG37mj9g=
...when the SHA-1 option was set.
As was mentioned in the previous post, as the database table with its users and passwords may be shared by non-WLS based applications, it's important that those systems can encrypt passwords and compare them to the WLS result. In other words, in the example above, given that WLS generated a SHA-1 encrypted password, if another system uses the same SHA-1 algorithm will it generate the same encrypted password allowing it to compare the database SHA-1 encrypted password against the SHA-1 encrypted password it has?
In order to check we can get the same encrypted results, we'll investigate generating a SHA-1 password using the Oracle database's encryption facilities (so in this case the database acts as the other subsystem), comparing the database's encrypted SHA-1 password to that of WLS.
The following solution owes thanks to Sean at Oracle Support who very patiently led me in the right direction with my findings.
dbms_crypto
Oracle database fans will be familiar with the dbms_crypto package that provides encryption support.
dbms_crypto allows us to generate an encrypted password that we can compare to the WLS result. From table 34-1 of the dbms_crypto link, we note that dbms_crypto supports the following one-way hash algorithms: SHA-1, MD4 and MD5. As WLS via the JCE extensions (see the previous post) supports SHA-1, MD2 and MD5, it's fortunate we picked SHA-1 for this example.
The following anonymous PL/SQL block shows an example using the dbms_crypto package hash function with SHA-1 to produce an encrypted result:
Note the output, a hex value, and doesn't match our WLS output for the same plaintext password "password" encrypted with SHA-1.
DECLARE
  input_string  VARCHAR2(8);
  raw_input     RAW(128);
  encrypted_raw RAW(2048);
BEGIN
  input_string := 'password';
  raw_input    := utl_raw.cast_to_raw(convert(input_string, 'AL32UTF8','US7ASCII'));

  encrypted_raw := dbms_crypto.hash(src => raw_input, typ => dbms_crypto.hash_sh1);
  dbms_output.put_line('Output: ' || encrypted_raw);
END;
/

Output: 5BAA61E4C9B93F3F0682250B6CF8331B7EE68FD8
The missing bit of information (that I haven't found documented) is that WLS after encrypting the plaintext password, as confirmed by Oracle Support, WLS then converts the output to base 64. In the case of the dbms_crypto hash function, it converts the encrypted result to Hex. In order to get the same result you need to convert the Hex output to base 64.
There's a number of different ways to do this. One is to use a Java routine in the database, converting the dbms_crypto Hex result to a byte array, then byte array to base 64. A suitable algorithm would be:
...where the hexStringToByteArray function is borrowed from Dave L on StackOverflow.
byte[] bytearray = hexStringToByteArray("5BAA61E4C9B93F3F0682250B6CF8331B7EE68FD8");
String base64encoded = new BASE64Encoder().encodeBuffer(bytearray);
The end result is: W6ph5Mm5Pz8GgiULbPgzG37mj9g= ... finally matching what WLS wrote to the database (missing the algorithm prefix of course).
Conclusion
Why the WebLogic Server's SQLAuthenticator can make use of different encryption algorithm when writing to the database, it's important to ensure that the results are expected and understood and can be used by other subsystems.
Monday, 19 October 2009
My OOW presentations - part II
My 2 presentations for OOW are now available for download from the SAGE Computing Services website here:
SOA Lite: A taste of SOA with a smidgen of Web Services
Oracle JDeveloper 11g JAX-WS Web Services: As easy as 1-2-3: XSD, WSDL, Generate!
SOA Lite: A taste of SOA with a smidgen of Web Services
Oracle JDeveloper 11g JAX-WS Web Services: As easy as 1-2-3: XSD, WSDL, Generate!
Saturday, 10 October 2009
My OOW presentations
If you're heading to OOW and would love to hear my Aussie accent, my sessions are:
SOA Lite: A taste of SOA with a smidgen of Web Services
S312176 - Sunday 13:00 - 14:00 - Moscone West L3 Room 3000
Abstract: Attempting to gorge yourself on a five-course SOA meal may result in a stomachache and a bill you can least afford at the moment. Instead, a quick and easy recipe with some simple Web services ingredients will give your systems that little taste of SOA you so crave. This session describes why Web services may be a better fit for you than SOA, discusses qualities of contemporary Web services and what skills to focus on when starting out with Web services, and presents a few hints and tips from the Web service trenches.
Oracle JDeveloper 11g JAX-WS Web Services: As easy as 1-2-3: XSD, WSDL, Generate!
307476 - Tuesday 17:30 - 18:30 - Hilton Hotel - Golden Gate 8
Abstract: Web services used to be hard. Creating XML schemas, long-winded Web Services Description Language (WSDL) code, and back-end Java code took much effort. Today Oracle JDeveloper 11g enables developers to visually design both the schemas and WSDL code by drag and drop and generate Web services based on both of these with the latest Java EE JAX-WS/JAXB Web service standards with just a few clicks. Finally programmers can get back to thinking about the programming problem they need to solve without wasting time setting up the Web service artifacts, which can be tedious, error-prone, and very repetitive. Learn more in this session.
In addition we have three ADF Enterprise Methodology Group sessions, one an official session and the other two part of the Unconference:
Oracle ADF Enterprise Methodology Group
312516 - Sunday 10:30 - 11:30 - Moscone West L3 - Room 3014
+ double session Wednesday 13:00 - 15:00 - Moscone West Floor 3 Overlook 1
Abstract: Although Oracle provides leading-edge software to build enterprise applications, there’s more to creating productive teams and delivering successful projects than just the tools. The Oracle ADF Enterprise Methodology Group, formed by Oracle Application Development Framework (Oracle ADF) practitioners around the world to fill that gap, considers wider issues such as best practices, maximizing code reuse, optimizing teamwork, and more. In this session, Oracle JDeveloper and Oracle ADF experts, including Oracle staff and Oracle ACEs, talk about such high-level Oracle ADF considerations. The Oracle ADF Enterprise Methodology Group is meeting at Oracle OpenWorld under the banner of the ODTUG Fusion Middleware SIG for 2009.
I hope to see you at OOW!
Monday, 5 October 2009
Part I - Working with WLS 10.3.1 SQLAuthenticator password algorithms
WebLogic Server 10.3.1 supports loading user credentials and roles from a number of different sources, such as LDAP or a database, through the concept of "Security Providers". In order to work with a database table structure a "SQL Authenticator" provider is required.
Edwin Biemond has a good example of setting up both the database table structures and configuring the WLS SQL Authenticator against these tables. To keep the example simple, for the password field in the JHS_USERS table Edwin's has set the SQL Authenticator to write raw plain text passwords to the table. This makes it really easy for demonstration purposes to see what's written to the database.
To extend Edwin's post, a common requirement will be that:
a) The password value is written in an encrypted form to the database
b) Other non-WLS applications can generate the same encrypted result such that the encrypted passwords can be compared
The need for point "a" is obvious, unencrypted password in the database is a security weakness. But what about "b", why would you want this?
For many organisations the list of users and roles will be stored in database tables, and that information will be sourced by many different subsystems implemented in different technologies. It's not uncommon for sites to have Oracle Forms, .Net, JEE (and ADF of course!) applications all relying on the database user tables for their authentication and authorisation information.
Each of these subsystems would require users to login. The subsystem would then encrypt the password, retrieve the corresponding password from the database for the identified user, and compare the results. If they compare, we have a valid user; if the encrypted passwords are different, ring the alarm bells, we have an imposter (or at least make them login again ;-)
All things would be well with this solution, until you throw in the fact that each subsystem may support different encryption algorithms that would produce different results, effectively failing the encrypted password comparison each time. It becomes essential therefore that WLS's SQL Authenticator supports different encryption algorithms in order to provide as much flexibility as possible.
Password Settings
On configuring a SQL Authenticator as per Edwin's example, on accessing the Provider Specific information (from the WLS console select Security Realms -> myrealm -> Providers tab -> your named SQL Authenticator -> Configuration tab -> Provider Specific tab), you'll note the following options that influence the generation of encrypted passwords:
* Plaintext Passwords Enabled – true/false – relates how passwords are read from the database table. If true when WLS retrieves the password from the database, and it encounters a non encrypted password, it will undertake a non encrypted comparison between the user's password who is attempting to login against the database retrieved password. If false, WLS will enforce the database password must be encrypted for it to undertake an encrypted password comparison.
The question arises, how does WLS know the database password is encrypted? The answer is derived from the next detailed property Password Style Retained, where WLS when writing a new encrypted password to the database prefixes the encrypted password with the encryption algorithm that was used to encrypt the password. If it's missing, WLS assumes a plaintext password.
If the Plaintext Passwords Enabled property is false, one other side effect is if you attempt to set the Password Style property to PLAINTEXT, then update a user's password in the database, WLS will throw an error stating it doesn't support PLAINTEXT passwords:
[Security:099063]Plaintext password usage was rejected.
Thanks to Ming at Oracle Support for clarifying this property.
* Password Style Retained – true/false – the following properties unlike the Plaintext Passwords Enabled property deal with when updating existing user passwords in the database table, not when the password is read. When WLS writes a password to the table's password field, along with the encrypted text, it prefixes the password with the password algorithm used wrapped in ellipses. For example if the SHA-1 algorithm is used, the password would look like:
{SHA-1}W6PH5MM5PZ8GGIULBPGZG37MJ9G=
If the Password Style Retained property is set to true, and the existing password has a different encryption algorithm to that specified in the Password Algorithm field, WLS will use the latter to update the password. If Password Style Retained is set to false, regardless, WLS will overwrite the password with that specified in the Password Algorithm field.
* Password Algorithm – text field – default SHA-1 – as per the WLS documentation this can be any Java Cryptography Extension (JCE). Questionably what are the allowable values derived from the JCE? These are listed in the JSE 6.0 Java Cryptography Architecture Standard Algorithm Name Documentation.
For password generation we want a hash (aka. message digest or 1-way encryption) algorithm. From the documentation we find that our options are limited to SHA-1 (the default Password Algorithm value), MD2 and MD5.
Note that the JSE documentation states the bit size of the produced message digest (SHA-1 = 160-bit, MD2 = 128-bit, MD5 = 128-bit), which will influence the size of your password field to store the encrypted database value.
The Password Algorithm can be ignored if the Password Style is PLAINTEXT, or, the Password Style Retained is set to true and the password to be updated does not match the current Password Algorithm's specified function.
* Password Style – PLAINTEXT, HASHED, SALTEDHASHED – as guessed the PLAINTEXT option will write the unencrypted password to the database. A value of HASHED implies the Password Algorithm will be used. SALTEDHASHED also produces encrypted passwords though different from HASHED. I'm currently unsure of the difference between HASHED and SALTEDHASHED, the WLS documentation doesn't differentiate between them, though it does result in a different encrypted value.
Testing
Assuming you've configured your SQL Authenticator correctly as per Edwin's post, let's test what the different settings of the properties do.
For our testing let's assume there's always an existing user ALPHA whose password we want to update, as well as new users BETA, CHARLIE and DELTA (and so on) who we want to create with a new password.
First test
Plaintext Passwords Enabled = true
Password Style Retained = true
Password Algorithm = SHA-1
Password Style = HASHED
For the existing user ALPHA the encrypted password doesn't include the algorithm prefix (ie. {SHA-1}), in fact it was created by some other system that doesn't include the prefix. The ALPHA's password will be updated to "password".
For a new user BETA the password will be set to "password".
First result
Updated user ALPHA password = "password"
For the ALPHA users this result occurs because WLS encounters the Plaintext Passwords Enabled set to true, and the original password stored for the ALPHA user is unencrypted (ie. it's missing the algorithm prefix). WLS therefore decides an update to the password must be a plaintext password update.
New user BETA password = {SHA-1}W6ph5Mm5Pz8GgiULbPgzG37mj9g=
In this case the BETA user makes use of the SHA-1 algorithm.
Second test
Plaintext Passwords Enabled = true
Password Style Retained = false
Password Algorithm = SHA-1
Password Style = HASHED
Same as the last test, for the existing ALPHA user the encrypted password doesn't include the algorithm prefix (ie. {SHA-1}), in fact it was created by some other system that doesn't include the prefix. The ALPHA's password will be updated to "password".
For a new user CHARLIE the password will be set to "password".
Second result
Updated user ALPHA password = {SHA-1}W6ph5Mm5Pz8GgiULbPgzG37mj9g=
New user CHARLIE password = {SHA-1}W6ph5Mm5Pz8GgiULbPgzG37mj9g=
In this case the Password Style Retained has overwritten the updated user ALPHA's password style with the new SHA-1 algorithm equivalent as the Password Style Retained = false setting removes the original plaintext algorithm – in other words the SHA-1 algorithm takes precedence. As expected the CHARLIE user's passwords uses the SHA-1 algorithm by default.
Third test
In this test we'll use the existing SHA-1 user ALPHA SHA-1 password, while switching to the MD2 algorithm, while not retaining passwords styles:
Plaintext Passwords Enabled = true
Password Style Retained = false
Password Algorithm = MD2
Password Style = HASHED
Existing ALPHA password = {SHA-1}W6ph5Mm5Pz8GgiULbPgzG37mj9g=
For a new user DELTA the password will be set to "password".
Third result
Existing ALPHA password = {MD2}8DiBqIxuORNfDsxg79YJuQ==
New user DELTA password = {MD2}8DiBqIxuORNfDsxg79YJuQ==
As can be seen WLS switches to the MD2 algorithm in both cases as the Password Style Retained = false property enforces this.
Fourth test
In the last test we'll switch back to the SHA-1 algorithm, and attempt to update the ALPHA user's MD2 password to the SHA-1 equivalent asking WLS not to retain the existing password style:
Plaintext Passwords Enabled = true
Password Style Retained = false
Password Algorithm = SHA-1
Password Style = HASHED
Existing ALPHA password = {MD2}8DiBqIxuORNfDsxg79YJuQ==
Fourth result
Existing ALPHA password = {SHA-1}W6ph5Mm5Pz8GgiULbPgzG37mj9g=
As expected the ALPHA user's password is changed from the MD2 to SHA-1 encrypted password, again as the Password Style Retained = false property takes affect.
Conclusion
At this point we've seen how WLS can generate encrypted passwords using different algorithms down to the database. From here it's important to check the encrypted results in the database are actually "standard". In other words if a competing technology uses the SHA-1 algorithm to encrypt a password for example, will it see the same encrypted result WLS produced. This will be addressed in a following post.
Tuesday, 29 September 2009
Where real ADF developers meet - OOW09 ADF EMG
Once again the ADF Enterprise Methodology Group is meeting at Oracle Open World to discuss JDeveloper and ADF, and we invite you to join us. This year Simon Haslam has taken the reins and delivered not 1 but 3 sessions at OOW which is an impressive effort.
Of particular interest to me is the "Show me yours!" session where ADF experts will be showing their production level ADF applications, essentially JDeveloper applications in the wild! We encourage you to join us, if not to show and tell, to just hear discussions among ADF experts on what challenges and solutions they're working with each day in the ADF market.
Can't make OOW this year but really want to attend ADF EMG? Are you attending the upcoming UKOUG conference instead? ADF EMG is going international this year, after our success at the ODTUG conference session in the excellent hands of Nathalie Roman, then OOW in October, we're happy to announce we'll be running a session at the UKOUG conference too. Watch this space for more information soon!
Tuesday, 22 September 2009
Blatant advert: Yes, we still do Oracle Forms development and training
Blatant plug for SAGE Computing Services. Avert your eyes now if you're not interested in the advert.
I was again asked today by a fellow Oracle professional, as we at SAGE present and blog on the latest JDeveloper and APEX technologies among others, does that mean we've dropped Oracle Forms development and teaching our Oracle Forms training course in Australia altogether?
Not at all. Oracle Forms is still a primary area of development for us and many of our customers, and our Oracle Forms training course has been updated every version since 4.5 to 10g, and soon to be Oracle Forms 11g. While our staff have interest in newer technologies, Forms will remain a skillset we'll maintain into the future, as Forms is pivotal to the success of our clients.
Our Oracle Forms training course, as long as our other Australian Oracle training courses can be found on our website.
Another Aussie Oracle blogger - Scott Wesley
Did I already post/tweet/email about Scott and his blog somewhere? I forgot. In the rush up to Oracle Open World, and moving house, I'm losing track big time of what I've done and haven't done. If I turn up to OOW without any pants you'll know why.
Anyhow, Scott Wesley, a fellow SAGE-ite, has taken up the Oracle blog reins, and can be found at Triangle Circle Square. Scott's one of the team's ninja consultants and Oracle trainers, defender of all things Oracle, except JDeveloper it seems, which makes me highly suspicious. Scott's current blog focus is SQL features, which seems oh-so-persistant-store-to-me. However I'm sure the SQL keen among you will enjoy his posts.
For the user groups out there, like much of the SAGE team, Scott is happy to present to your members. Drop us an email to arrange.
Friday, 11 September 2009
WebLogic Server - identity vs trust keystores
In computing most technologies have lots of terms and acronyms to learn, it's par for the course, you get used to it. However in computer security the frustration is multiplied as there are often many different terms that mean the same thing. It makes implementing security hard, because understanding it is hard, and I'm not surprised why security is considered badly implemented because the average Joe will struggle (and for the record I'm the average Chris so I struggle too ;-).
I've been trying recently to get straight in my head what is stored in the WLS identity and trust keystores, and what the difference between identity and trust is anyhow. Thanks to kind assistance from Gerard Davison, I think I can now post my understandings, and as usual, hopefully the post is helpful to other readers. As noted however security to me is a difficult area, and so be sure to check the facts here, your mileage with this post may vary.
The following WLS documentation attempts to explain the concepts of identity and trust:
http://download.oracle.com/docs/cd/E12839_01/web.1111/e13707/identity_trust.htm#i1170342
...in ripping out one of the core paragraphs, with a slight rewrite of my own we can see the concept of identity, and how it relates to the public and private keys:
"The public key is embedded in a digital certificate with additional information describing the owner of the public key, such as name, street address, and e-mail address *as well as the hostname*. *Along with this the digital certificate containing the public key, and the separate related private key, provide identity for the server*."
...ultimately to identify the server, to assert the server is who the server says it is.
The digital certificate containing the public key is also referred to as the "server certificate", as for example in 1-way-SSL traffic between the server and client, the server certificate containing the public key is what is initially passed to the client.
There is a missing piece in the puzzle. Regardless that the digital certificate states the owner of the public key, their name and so on, how does a client know that the "identity" asserted by the digital certificate is true? That's where Certificate Authorities (CAs) come in.
Ignoring self signed digital certificates, a typical digital certificate used on the internet containing the public key and owner details is signed by a trusted CA who has verified the identity of the owner. Presumably when purchasing digital certificates from CAs, this is what some of the cost covers, the CAs research into ensuring that the identity details embedded in the digital cert are actually true.
At runtime on receiving the digital certificate, the client checks the CA and if the CA is one that the client trusts (or a CA in a chain of trusted CAs), then the identity of the server is established/verified.
Thus the "identity" of the server is established by what's stored in the "identity" keystore, and its contents are what are farmed out to clients establishing secure connections with the server, who then verify the supplied digital certificate's CA against the clients own list of trusted CAs. The "identity keystore" is also referred to as the "server keystore", because it establishes the server's identity (ie. I am who I say I am).
WLS side note: As mentioned the digital certificate also includes the host name of the server, or in other words the digital certificate is pegged to that server and that server alone. This implies on that server with its relating digital certificate, *all* of the applications will share that single digital certificate for secure communications. Occasionally a requirement will arise where each application must have its own digital certificate. In WLS because keystores are configured under an individual WLS "managed server", if you have two separate applications, it is not possible to use separate digital certificates for each in one managed server. The solution is to create another managed server with its own keystores.
WLS web service side note: Following on from the previous side note, for web services that use in-message encryption and digital signatures, there is often the requirement for multiple different digital certificates. Under WLS to provision the WS-Security model, WLS has a separate Web Service Security Configuration (WSSC) to provision this setup.
Finally regarding the trust keystore, what is its job in all of this? The trust keystore is typically used for storing CA digital certificates, essentially the CAs who will be used to check any digital certificates that are given to the server at runtime (just the same as the client did above). In the standard 1-way-SSL between a client and the WLS server, the trust keystore doesn't come into the equation as the client has its own trust keystore (containing the CAs) and the server has nothing to verify. Yet in the case of mutual SSL (aka. 2 way SSL) between the client and server, the client and server actually swap each other digital certificates to establish identity of both parties, and in this case the server must be able to test the identity of the client through the CA of the client's digital certificate.
Mutual SSL side note: the setup of mutual SSL is more complicated than this. Readers are advised to refer to the following Oracle article.
Final author's note: if any readers find anything particularly wrong with the ideas presented in this post I'd be keen to hear them please. As I've really only experience with 1-way-SSL, it's hard to know if what I've said applies to the concepts of mutual SSL and other security configurations.
Wednesday, 2 September 2009
JDev 11gR1 - af:tree mashup – using hierarchical tables and drag n drop
This blog post demonstrates creating an ADF Faces RC af:tree component that sources its data from a hierarchical database table, and supports drag n drop of the nodes.
Both these topics have been discussed and demonstrated by other excellent bloggers, the core of this post is to bring both concepts together, with my usual own proof of concept documentation that may be useful to readers.
The ADF Faces RC support for hierarchical data sources was defined by Chandu Bhavsar.
The drag and drop support for af:trees was documented by Luc Bors.
(Definitely the kudos for this post must go to both Chandu and Luc for their posts that sparked the inspiration for mine)
Data model
In this example we'll use the following table:
The data:
This details the steps to setup an ADF BC layer and ADF Faces RC bindings to support the af:tree with hierachical data from the organisations table, as previously described in Chandu Bhavsar post.
Note the following steps are well documented on Chandu's post, though you will find slightly more detail on creating the correct bindings below:
1) Create a Fusion Web App with an ADF BC Model project and ADF Faces RC ViewController.
Model project
2) In the Model project create an empty Application Module (AM)
3) Create an Entity Object (EO) based on your organisations table in the database.
4) Create two View Objects (VO) based off the same EM. Name the first ParentOrgView and the second LeafOrgView.
5) Modify the ParentOrgView query as follows:
 Essentially:
ParentOrgView.OrgId = LeafOrgView.ParentOrgId
8) Create a second VO Link between the LeafOrgView to itself as follows:
 Essentially:
LeafOrgView (source).OrgId = LeafOrgView (dest).ParentOrgId
9) Externalize the VOs through the AM using the following model:
 Essentially:
ParentOrgView1
- LeafOrgView1
- - LeafOrgView2
ViewController project
10) In your ViewController project create a new blank JSF page called treeMashupDemo.jspx.
11) From the Data Control Palette drag the ParentOrgView onto the page as a tree. In the Edit Tree Binding you should see the following:
 Note the first level of the tree has been defined as model.ParentOrgView.
12) For clarity when testing later, ensure both the OrgId and Name are included in the Display Attributes.
13) With the model.ParentOrgView node selected in the Tree Level Rules, select the green plus (+) button and select LeafOrgView:

14) With the LeafOrgView node selected in the Tree Level Rules, ensure both the OrgId and Name are included in the Display Attributes.
15) Again with the LeafOrgView node selected in the Tree Level Rules, again select the green plus (+) button, and select LeafOrgView__2:
 Note how the Tree Level Rules only has 2 nodes, but to the right of each node is the child of the current node. Of specific interest in the hierarchical relationship between LeafOrgView and LeafOrgView__2.
16) For reference the JSF af:tree code is as follows:
 ..and the page def XML file as follows:
Testing
On running our web page we see the following:
 Note that the tree is happily showing the hierarchical data based on our tree bindings.
Adding drag n drop to the tree
The next set of functionality we wish to add is the ability to drag and drop nodes, or in our case organisations, in the tree. This involves adding support for drag n drop to the tree, as well as behind the scenes updating the dropped organisation's parent_org_id to that of the org_id of the organisation the original was dropped on.
The inspiration of this section comes from Luc Bors blog post, with slight difference in mine some of the supporting code is further spelt out:
1) As a reminder at the moment our af:tree code looks as follows:
3) In your adfc-config.xml file declare a bean treeBean of class view.TreeBean:

4) And create a Java class TreeBean in your view package within the ViewController project.
5) Create an AppModuleImpl for the AM
6) Create a LeafOrgViewImpl for the VO
7) Create a LeafOrgViewRowImpl for the VO and ensure to include the accessors
8) In the AM expose the LeafOrgView VO one more time as its own node (not a child), and call the usage LeafOrgViewAll as follows:

9) Finally the dragAndDrop code is as follows. Note the code includes inline documentation comments that explains what is occurring:
This does pose a problem, because while during testing it's fine to show the OrgId and Name of the organisations in the tree, for production we might not want to show these meaningless internal ID numbers to the user. The simple fix for this is to return to the af:tree and update the af:outputText component who is responsible for what values to show for each node in the tree, changing the EL expression from #{code} to #{code.Name}:

Both these topics have been discussed and demonstrated by other excellent bloggers, the core of this post is to bring both concepts together, with my usual own proof of concept documentation that may be useful to readers.
The ADF Faces RC support for hierarchical data sources was defined by Chandu Bhavsar.
The drag and drop support for af:trees was documented by Luc Bors.
(Definitely the kudos for this post must go to both Chandu and Luc for their posts that sparked the inspiration for mine)
Data model
In this example we'll use the following table:
CREATE TABLE organisationsNote the FK between the table and itself, essentially modelling that an organisation has sub-organisations (or agencies).
(org_id NUMBER(4,0) NOT NULL
,parent_org_id NUMBER(4,0)
,name VARCHAR2(35) NOT NULL
,CONSTRAINT org_pk PRIMARY KEY (org_id)
,CONSTRAINT org_parent_fk
FOREIGN KEY (parent_org_id)
REFERENCES organisations (org_id));
The data:
ORG_ID PARENT_ORG_ID NAMEHierarchical af:tree
------ ------------- -------------------------------
1000 (null) Sage Computing Services
1010 1000 Training Division
1030 1010 Self Study Program
1040 1010 Classroom Training
2264 (null) Australian Medical Systems
3210 (null) Conservation Society
3214 3210 Forests Division
3216 3210 Rivers Division
4394 (null) Newface cosmetics
3842 (null) Institute of Business Services
3843 3842 Marketing Services
3844 3842 Financial Services
This details the steps to setup an ADF BC layer and ADF Faces RC bindings to support the af:tree with hierachical data from the organisations table, as previously described in Chandu Bhavsar post.
Note the following steps are well documented on Chandu's post, though you will find slightly more detail on creating the correct bindings below:
1) Create a Fusion Web App with an ADF BC Model project and ADF Faces RC ViewController.
Model project
2) In the Model project create an empty Application Module (AM)
3) Create an Entity Object (EO) based on your organisations table in the database.
4) Create two View Objects (VO) based off the same EM. Name the first ParentOrgView and the second LeafOrgView.
5) Modify the ParentOrgView query as follows:
SELECT Organisations.ORG_ID,6) You don't need to modify the LeafOrgView query. For completeness it's described as follows:
Organisations.PARENT_ORG_ID,
Organisations.NAME
FROM ORGANISATIONS Organisations
WHERE Organisations.PARENT_ORG_ID IS NULL
SELECT Organisations.ORG_ID,7) Create a VO Link between the ParentOrgView and LeafOrgView as follows:
Organisations.PARENT_ORG_ID,
Organisations.NAME
FROM ORGANISATIONS Organisations
 Essentially:
ParentOrgView.OrgId = LeafOrgView.ParentOrgId
8) Create a second VO Link between the LeafOrgView to itself as follows:
 Essentially:
LeafOrgView (source).OrgId = LeafOrgView (dest).ParentOrgId
9) Externalize the VOs through the AM using the following model:
 Essentially:
ParentOrgView1
- LeafOrgView1
- - LeafOrgView2
ViewController project
10) In your ViewController project create a new blank JSF page called treeMashupDemo.jspx.
11) From the Data Control Palette drag the ParentOrgView onto the page as a tree. In the Edit Tree Binding you should see the following:
 Note the first level of the tree has been defined as model.ParentOrgView.
12) For clarity when testing later, ensure both the OrgId and Name are included in the Display Attributes.
13) With the model.ParentOrgView node selected in the Tree Level Rules, select the green plus (+) button and select LeafOrgView:

14) With the LeafOrgView node selected in the Tree Level Rules, ensure both the OrgId and Name are included in the Display Attributes.
15) Again with the LeafOrgView node selected in the Tree Level Rules, again select the green plus (+) button, and select LeafOrgView__2:
 Note how the Tree Level Rules only has 2 nodes, but to the right of each node is the child of the current node. Of specific interest in the hierarchical relationship between LeafOrgView and LeafOrgView__2.
16) For reference the JSF af:tree code is as follows:
<af:tree value="#{bindings.ParentOrgView1.treeModel}"
         var="node"
         selectionListener="#{bindings.ParentOrgView1.treeModel.makeCurrent}"
         rowSelection="single"
         id="t1">
  <f:facet name="nodeStamp">
    <af:outputText value="#{node}" id="ot1"/>
  </f:facet>
</af:tree>
...the bindings look as follows: ..and the page def XML file as follows:
<?xml version="1.0" encoding="UTF-8" ?>
<pageDefinition xmlns="http://xmlns.oracle.com/adfm/uimodel" version="11.1.1.54.7" id="treeMashupDemoPageDef"
                Package="view.pageDefs">
  <parameters/>
  <executables>
    <variableIterator id="variables"/>
    <iterator Binds="ParentOrgView1" RangeSize="25" DataControl="AppModuleDataControl" id="ParentOrgView1Iterator"/>
  </executables>
  <bindings>
    <tree IterBinding="ParentOrgView1Iterator" id="ParentOrgView1">
      <nodeDefinition DefName="model.ParentOrgView" Name="ParentOrgView10">
        <AttrNames>
          <Item Value="OrgId"/>
          <Item Value="Name"/>
        </AttrNames>
        <Accessors>
          <Item Value="LeafOrgView"/>
        </Accessors>
      </nodeDefinition>
      <nodeDefinition DefName="model.LeafOrgView" Name="ParentOrgView11">
        <AttrNames>
          <Item Value="OrgId"/>
          <Item Value="Name"/>
        </AttrNames>
        <Accessors>
          <Item Value="LeafOrgView_2"/>
        </Accessors>
      </nodeDefinition>
    </tree>
  </bindings>
</pageDefinition>
Testing
On running our web page we see the following:
 Note that the tree is happily showing the hierarchical data based on our tree bindings.
Adding drag n drop to the tree
The next set of functionality we wish to add is the ability to drag and drop nodes, or in our case organisations, in the tree. This involves adding support for drag n drop to the tree, as well as behind the scenes updating the dropped organisation's parent_org_id to that of the org_id of the organisation the original was dropped on.
The inspiration of this section comes from Luc Bors blog post, with slight difference in mine some of the supporting code is further spelt out:
1) As a reminder at the moment our af:tree code looks as follows:
<af:tree value="#{bindings.ParentOrgView1.treeModel}"
         var="node"
         selectionListener="#{bindings.ParentOrgView1.treeModel.makeCurrent}"
         rowSelection="single"
         id="t1">
  <f:facet name="nodeStamp">
    <af:outputText value="#{node}" id="ot1"/>
  </f:facet>
</af:tree>
2) We then introduce a collectionDragSource and a collectionDropTarget to support the drag and drop within the tree:<af:tree value="#{bindings.ParentOrgView1.treeModel}"
var="node"
selectionListener="#{bindings.ParentOrgView1.treeModel.makeCurrent}"
rowSelection="single"
id="t1">
<af:collectionDragSource actions="MOVE"
modelName="DnDOrganisations"/>
<af:collectionDropTarget actions="MOVE"
modelName="DnDOrganisations"
dropListener="#{treeBean.dragAndDrop}"/>
<f:facet name="nodeStamp">
<af:outputText value="#{node}" id="ot1"/>
</f:facet>
</af:tree>Note both support the MOVE action, they both specify a matching modelName DnDOrganisations, and finally the dropListener maps to a backing bean method we'll define in a moment. It's essential the modelName's match including the case of the name, and we'll be referring to this in the dragAndDrop backing bean treeBean method in a moment.3) In your adfc-config.xml file declare a bean treeBean of class view.TreeBean:

4) And create a Java class TreeBean in your view package within the ViewController project.
package view;The real work for drag and drop is done in the backing bean method. However in order for the code to work there are a couple of items we need to configure in the Model project:
public class TreeBean {
}
5) Create an AppModuleImpl for the AM
6) Create a LeafOrgViewImpl for the VO
7) Create a LeafOrgViewRowImpl for the VO and ensure to include the accessors
8) In the AM expose the LeafOrgView VO one more time as its own node (not a child), and call the usage LeafOrgViewAll as follows:

9) Finally the dragAndDrop code is as follows. Note the code includes inline documentation comments that explains what is occurring:
package view;You'll note in the code I take pains to mention it's essential the OrgId is one of the displayed attributes for the tree. If you fail to supply this the routine has no OrgId attribute to fetch the OrgId value from.
import model.AppModuleImpl;
import model.LeafOrgViewImpl;
import model.LeafOrgViewRowImpl;
import model.ParentOrgViewRowImpl;
import oracle.adf.model.BindingContext;
import oracle.adf.view.rich.component.rich.data.RichTree;
import oracle.adf.view.rich.datatransfer.DataFlavor;
import oracle.adf.view.rich.datatransfer.Transferable;
import oracle.adf.view.rich.dnd.DnDAction;
import oracle.adf.view.rich.event.DropEvent;
import oracle.adfinternal.view.faces.model.binding.FacesCtrlHierNodeBinding;
import oracle.jbo.Key;
import oracle.jbo.uicli.binding.JUCtrlHierNodeBinding;
import org.apache.myfaces.trinidad.model.CollectionModel;
import org.apache.myfaces.trinidad.model.RowKeySet;
public class TreeBean {
public DnDAction dragAndDrop(DropEvent dropEvent) {
// The default action - do nothing
DnDAction result = DnDAction.NONE;
// Represents the object that was dropped
Transferable draggedTransferObject = dropEvent.getTransferable();
// The data in the draggedTransferObject "Transferrable" object is the row key for the dragged component.
// Note how the DnDOrganisations value in the call to getDataFlavor() matches the collectionDragSource
// and collectionDropTarget tags model attributes in our page. It's essential the strings exactly match.
DataFlavor<RowKeySet> draggedRowKeySetFlavor = DataFlavor.getDataFlavor(RowKeySet.class, "DnDOrganisations");
RowKeySet draggedRowKeySet = draggedTransferObject.getData(draggedRowKeySetFlavor);
if (draggedRowKeySet != null) {
// We grab the tree's data model, essentially the CollectionModel that stores the complete tree of nodes
CollectionModel treeModel = draggedTransferObject.getData(CollectionModel.class);
// Ask the collection model to set the current row/node to that of the transferrable object that was dropped
Object draggedKey = draggedRowKeySet.iterator().next();
treeModel.setRowKey(draggedKey);
// Grab that current row (thanks to the last statements work) and get the row's OrgId. It's essential the
// OrgId is one of the displayed attributes in the tree binding.
FacesCtrlHierNodeBinding draggedTreeNode = (FacesCtrlHierNodeBinding)treeModel.getRowData();
oracle.jbo.domain.Number draggedTreeNodeId = (oracle.jbo.domain.Number)draggedTreeNode.getAttribute("OrgId");
// The dropEvent carries the target/location's row key where the dropped organisations was dropped
Object serverRowKey = dropEvent.getDropSite();
RichTree richTree = (RichTree)dropEvent.getDropComponent();
// This time we use the tree itself to make it's current row that of the server row key (ie. the destination)
richTree.setRowKey(serverRowKey);
// And we retrieve that row's index
int rowIndex = richTree.getRowIndex();
// The rich tree based on the index allows us to retrieve that current row/organisation's OrgId
oracle.jbo.domain.Number targetNodeId = (oracle.jbo.domain.Number)((JUCtrlHierNodeBinding)richTree.getRowData(rowIndex)).getAttribute("OrgId");
// At this point we now have the OrgId of the dropped organisation (draggedTreeNodeId) and the OrgId of the
// organisation that is the target. From here we simply want to update the dropped organisations' ParentOrgId
// to the OrgId of the target. This is best done through the model layer.
//
// Normally this would be best done by fetching the appropriate iterator bindings and making the changes through
// the bindings. However in this case the tree doesn't expose any iterator for the leaf nodes, so we need to
// resort to retrieve the Model project's objects and do the work ourself.
// Retrieve the AM and then a handle on the LeafOrgViewAll - this gives us access to all rows regardless of
// where they exist in the hierarchy
AppModuleImpl am = (AppModuleImpl)BindingContext.getCurrent().getDefaultDataControl().getApplicationModule();
LeafOrgViewImpl leafOrgView = (LeafOrgViewImpl)am.getLeafOrgViewAll();
// Given the dragged organisation's OrgId, construct a key object, and then retrieve that row from the VO using
// the key
Object[] nodeObjectKey = new Object[] {draggedTreeNodeId};
Key nodeKey = new Key(nodeObjectKey);
LeafOrgViewRowImpl nodeRow = (LeafOrgViewRowImpl)leafOrgView.getRow(nodeKey);
// See below
boolean parentNode = nodeRow.getParentOrgId() == null;
// Finally update that organisaiton's ParentOrgId to that of the target organisation's OrgId
nodeRow.setParentOrgId(targetNodeId);
// And commit the changes – obviously this has side effects on any other uncommitted data, be careful
am.getDBTransaction().commit();
// If we've moved a parent node to become a leaf, we need to force the parent VO to requery itself to correctly
// reflect the data change. This is destructive on the current expand/collapsed state of the tree.
// I'm not overly sure of a solution for this; maybe a reader can suggest one.
if (parentNode) {
am.getParentOrgView1().clearCache();
am.getParentOrgView1().executeQuery();
}
// Indicate to the dragEvent that the operation was succesful and visually the move should occur in the tree
result = DnDAction.MOVE;
}
return result;
}
}
This does pose a problem, because while during testing it's fine to show the OrgId and Name of the organisations in the tree, for production we might not want to show these meaningless internal ID numbers to the user. The simple fix for this is to return to the af:tree and update the af:outputText component who is responsible for what values to show for each node in the tree, changing the EL expression from #{code} to #{code.Name}:
<af:tree value="#{bindings.ParentOrgView1.treeModel}"
         var="node"
         selectionListener="#{bindings.ParentOrgView1.treeModel.makeCurrent}"
         rowSelection="single"
         id="t1">
  <af:collectionDragSource actions="MOVE"
                           modelName="DnDOrganisations"/>
  <af:collectionDropTarget actions="MOVE"
                           modelName="DnDOrganisations"
                           dropListener="#{treeBean.dragAndDrop}"/>
  <f:facet name="nodeStamp">
    <af:outputText value="#{node.Name}" id="ot1"/>
  </f:facet>
</af:tree>
This ensures only the name attribute is displayed:
Subscribe to:
Posts (Atom)