I'm currently working with JDeveloper 11g's facilities for generating
JAX-WS Java web services from a defined WSDL file. The following encompasses my notes on getting this running which may be useful to readers. Your mileage may vary.
GoalDefine a single web service operation using JAX-WS, to lodge a data payload with 2 fields and return a data payload of 3 fields. The incoming and outgoing payloads will be based on an XML Schema document. The web service operation JAX-WS Java code will be defined via first defining the WSDL in JDeveloper, then generating the JAX-WS wrappers based on the WSDL.
StepsThe steps we'll undertake in achieving our goal:
1) Setup an Application Workspace and Project
2) Create the XML Schema for the Web Service
3) Create the WSDL file for our Web Service
4) Generate the JAX-WS classes for our Web Service
5) Deploying our Web Service to WLS
Setup an Application Workspace and ProjectWe first need a JDeveloper Application Workspace and Project to store our work.
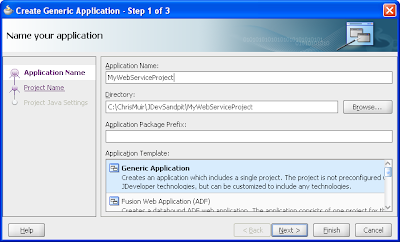
Via the New Gallery create a new Application Workspace based on the Generic Application template.
Ensure within step 2 of 2 for the Application Workspace, for the single project the template creates, that you include Web Services as part of the Project Technologies:
 Create the XML Schema for the Web Service
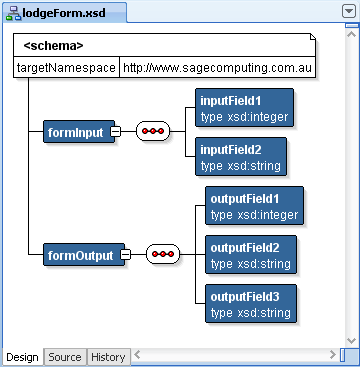
Our web service will be "document" based, passing XML payloads back and forwards based on an XML Schema. We need to define the XML Schema and its individual elements for both
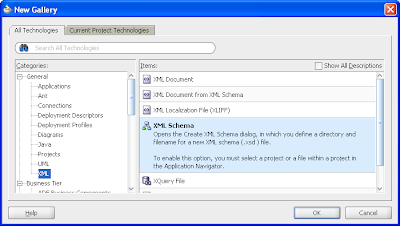
In the new project create a XML Schema via the New Gallery -> All Technologies -> General -> XML -> XML Schema option.
Give the XML Schema a name and change the default directory to:
&<app root>/<project name>/public_html/WEB-INF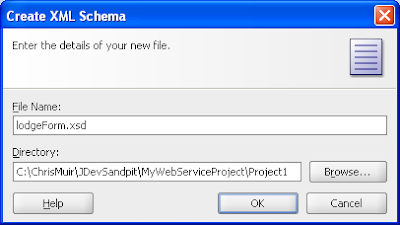
Modify the XML Schema using JDeveloper's XML Schema design facilities:
Or edit the XML code directly:
<?xml version="1.0" encoding="windows-1252" ?>
<xsd:schema xmlns:xsd="http://www.w3.org/2001/XMLSchema"
targetNamespace="http://www.sagecomputing.com.au"
elementFormDefault="qualified">
<xsd:element name="formInput">
<xsd:complexType>
<xsd:sequence>
<xsd:element name="inputField1" type="xsd:integer"/>
<xsd:element name="inputField2" type="xsd:string"/>
</xsd:sequence>
</xsd:complexType>
</xsd:element>
<xsd:element name="formOutput">
<xsd:complexType>
<xsd:sequence>
<xsd:element name="outputField1" type="xsd:integer"/>
<xsd:element name="outputField2" type="xsd:string"/>
<xsd:element name="outputField3" type="xsd:string"/>
</xsd:sequence>
</xsd:complexType>
</xsd:element>
</xsd:schema>Create the WSDL file for our web serviceThe WSDL file will define the structure of our web service operation, including data payloads, for consumers of our web service to understand our web service spec, as well as allow JDeveloper to generate the JAX-WS Java code implementing our web service operation.
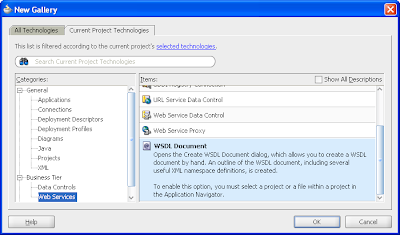
In our project select the New Gallery -> Current Project Technologies -> Business Tier -> Web Services -> WSDL Document:
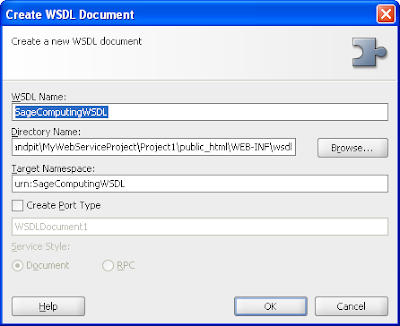
Give the WSDL file a name, leave the other fields the default values:
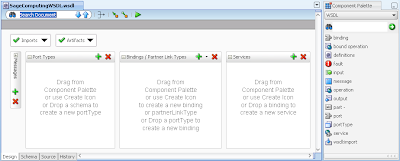
JDeveloper provides a graphical design tool where you can define the parts of the WSDL file, by dragging in components from the Component Palette, or using the available Add and Delete buttons to define each part:
First thing we wish to define with the WSDL file is code to import our XML Schema from the previous step. This is easiest done by inserting the following code into your WSDL file directly between the <definitions> tags, as well as adding the XML Schema as an xmlns attribute of the overall definitions:
<?xml version="1.0" encoding="UTF-8" ?>
<definitions targetNamespace="urn:SageComputingWSDL"
xmlns="http://schemas.xmlsoap.org/wsdl/"
xmlns:tns="urn:SageComputingWSDL"
xmlns:xsd="http://www.w3.org/2001/XMLSchema"
xmlns:soap="http://schemas.xmlsoap.org/wsdl/soap/"
xmlns:mime="http://schemas.xmlsoap.org/wsdl/mime/"
xmlns:soap12="http://schemas.xmlsoap.org/wsdl/soap12/"
xmlns:sage="http://www.sagecomputing.com.au">
<types>
<xsd:schema targetNamespace="http://www.sagecomputing.com.au">
<xsd:import namespace="http://www.sagecomputing.com.au" schemaLocation="../../lodgeForm.xsd"/>
</xsd:schema>
</types>
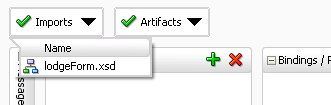
</definitions>On returning to the WSDL designer, the Import dropdown will now include the XML Schema as an import.
Next we need to define the message payloads for the web service operation, namely both an input and output based on the XML Schema we just imported.
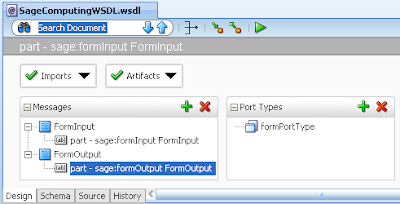
Expanding the Messages option within the WSDL designer and selecting the Add button, we add two messages, ie. FormInput and FormOutput.
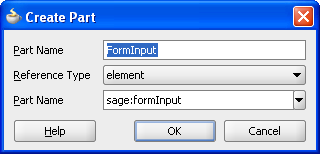
For the FormInput, we right click on the object, select Insert inside FormInput -> part. This displays the Create Part dialog where we give the part a name of FormInput, a Reference Type of Element, and select the sage:FormInput element.
We repeat this for the FormOuput, giving the part a name of FormOutput, a Reference Type of Element and select the sage:FormOutput element. The resulting WSDL design for the messages will look like:
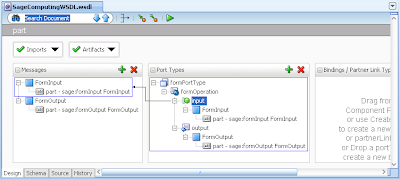
Next we define our Port Type supporting our web service operation. By clicking the Plus button on the Port Type option you can name the new port type, for instance: formPortType.
Next right click on the new Port Type, then the Insert inside formPortType option, followed by the Operation selection. This invokes the Create Operation dialog:

Here we define the operation name, that our operation will accept and return a payload (ie. Operation Type = Request Response), and select the Input and Output message types we defined in the earlier step.
On returning to the WSDL designer, selecting different parts of the messages and port types shows you diagrammatically the dependencies:
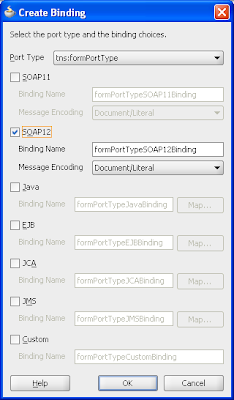
Next by clicking on the Add button in the Bindings we invoke the Create Binding dialog. This allows us to define the Binding is for the Port Type we just created, which version of SOAP we'll use as well as the binding name and message encoding style.
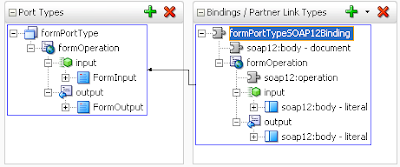
On returning to the WSDL designer we can now diagrammatically see the dependencies between the Bindings and the Port Types.
Finally in the WSDL designer we create the Service via the Add button on the Services component. Simply we give the Service a name such as SubmitForm.
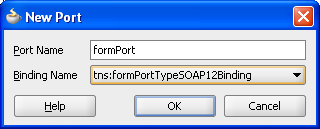
We then right click on the Service name, select the Insert into SubmitForm option then the port option. This allows us to define the Port name and the Binding that it maps too we created earlier:
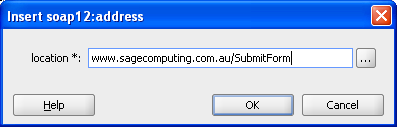
Within the Port we must add the URL address of the Port which encompasses the server we'll deploy the web service too, so we right click and select the Insert into soap12:address:
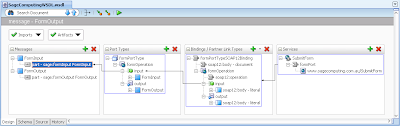
The complete WSDL diagram looks as follows:
 Generate the JAX-WS classes for our Web Service
Once we've created our WSDL file, JDeveloper provides a generator that will create JAX-WS based Java code based on what defined in the WSDL file, saving us having to code the Java code by hand.
Invoke the New Gallery -> Current Project Technologies -> Business Tier -> Web Services -> Java Web Services from WSDL option:
In the associated wizard skip Step 1 of 7. For Step 2 of 7 select the "Java EE 1.5, with support for JAX-WS Annotations" option.
In Step 3 of 7 select your WSDL file in the drop down, leave the default values.
In Step 4 of 7:
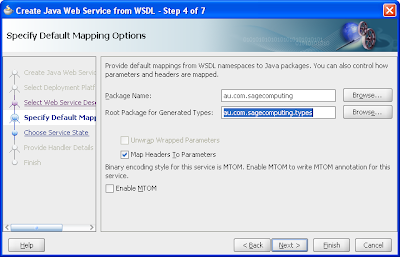
The Package Name is the Java package where your JAX-WS classes will go. The Root Package for Generated Types it the Java package that will encompass
JAXB Java classes that model your XML Schema elements, used by the JAX-WS web service code. Leave the other default values.
Click the wizard finish button.
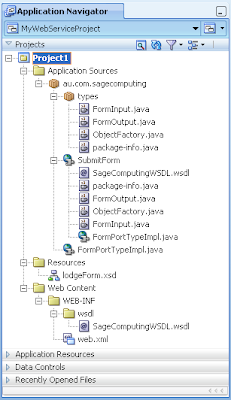
The generator will create a number of files with the resulting structure in the Application Navigator:
The most interesting of these to look at is the FormPortTypeImpl.java that implements the web services using JAX-WS:
package au.com.sagecomputing;
import au.com.sagecomputing.types.FormInput;
import au.com.sagecomputing.types.FormOutput;
import au.com.sagecomputing.types.ObjectFactory;
import javax.jws.WebMethod;
import javax.jws.WebParam;
import javax.jws.WebResult;
import javax.jws.WebService;
import javax.xml.bind.annotation.XmlSeeAlso;
import javax.xml.ws.Action;
import javax.xml.ws.BindingType;
import javax.xml.ws.soap.SOAPBinding;
@WebService(name = "formPortType", targetNamespace = "urn:SageComputingWSDL", serviceName = "SubmitForm", portName = "formPort", wsdlLocation = "/WEB-INF/wsdl/SageComputingWSDL.wsdl")
@XmlSeeAlso( { ObjectFactory.class })
@javax.jws.soap.SOAPBinding(style = javax.jws.soap.SOAPBinding.Style.DOCUMENT, parameterStyle = javax.jws.soap.SOAPBinding.ParameterStyle.BARE)
@BindingType(SOAPBinding.SOAP12HTTP_BINDING)
public class FormPortTypeImpl {
public FormPortTypeImpl() {
}
@javax.jws.soap.SOAPBinding(parameterStyle = javax.jws.soap.SOAPBinding.ParameterStyle.BARE)
@Action(input = "urn:SageComputingWSDL/formOperation", output = "urn:SageComputingWSDL/formPortType/formOperationResponse")
@WebMethod(action = "urn:SageComputingWSDL/formOperation")
@WebResult(name = "formOutput", targetNamespace = "http://www.sagecomputing.com.au", partName = "FormOutput")
public FormOutput formOperation(@WebParam(name = "formInput", partName = "FormInput", targetNamespace = "http://www.sagecomputing.com.au")
FormInput FormInput) {
return null;
}
}Note that the Java method formOperation accepts our FormInput datatype and returns the FormOutput type. Both of these classes have been generated as classes in their own right which we can now use as fully fledged Java classes. As such we can modify our formOperation method as follows:
public FormOutput formOperation(@WebParam(name = "formInput", partName = "FormInput", targetNamespace = "http://www.sagecomputing.com.au")
FormInput FormInput) {
FormOutput fo = new FormOutput();
fo.setOutputField1(FormInput.getInputField1().add(new BigInteger("5")));
fo.setOutputField2(FormInput.getInputField2().concat(": Welcome!"));
fo.setOutputField3("This is your reply");
return fo;
}Running our Web Service to WLSAssuming you've already set up a connection to your favourite WebLogic Server and pre-configured WLS domain in JDeveloper, to deploy our application from JDeveloper is simply a case of right clicking the project, then Deploy -> WebServices -> to -> (your server connection name).
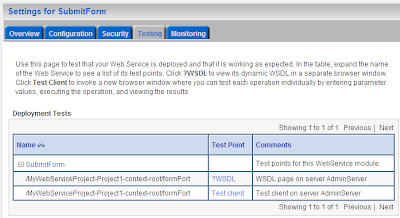
Once the application is deployed to WLS, logging into the WLS server console, clicking on the Deployments node, you'll see your application within WLS, which you can then expand to see your actual web service:

Selecting the web service, then the testing tab reveals both the URL of the WSDL file and the ability to invoke the Test Client:
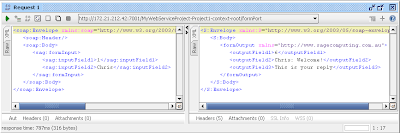
I'm currently unable to get the Test Client working, so instead I used SoapUI to create a new project plugging in the WSDL, selecting my web service, entering values for the generated XML payload with the following result: