Showing posts with label ADF Faces RC. Show all posts

Friday, 16 September 2011

ADF Faces: Optimizing retrieving beans programmatically

From time to time in JSF and ADF Faces RC applications there’s the need from one managed bean to retrieve another programatically, typically from a lesser scoped bean to a greater, such as a requestScope bean retrieving a sessionScope bean to access its methods. There’s essentially 3 avenues to solving this problem programatically:

1) The following JSF 1.1 createValueBinding method that retrieves the bean using EL:
FacesContext ctx = FacesContext.getCurrentInstance();
Application app = ctx.getApplication();
ValueBinding bind = app.createValueBinding("#{beanName}");
Bean bean = (Bean) bind.getValue(ctx);
Note parts of this code were deprecated since JSF 1.1

2) A JSF 2.0 compliant way using evaluateExpressionGet also evaluating EL to retrieve a bean:
FacesContext context = FacesContext.getCurrentInstance();
Bean bean = (Bean) context.getApplication().evaluateExpressionGet(context, "#{beanName}", Bean.class);
(Thanks to BalusC on StackOverFlow for the technique).

3) Or a direct programmatic method that doesn’t use EL:
ExternalContext exctxt = FacesContext.getCurrentInstance().getExternalContext();

AppBean appBean = (AppBean) exctxt.getApplicationMap().get("appBeanName");
SessionBean sessionBean = (SessionBean) exctxt.getSessionMap().get("sessionBeanName");
RequestBean sessionBean = (RequestBean) exctxt.getRequestMap().get("requestBeanName");

AdfFacesContext adfctxt = AdfFacesContext.getCurrentInstance();

ViewBean viewBean = (ViewBean)adfctxt.getViewScope().get("viewBeanName");
PageFlowBean pageFlowBean = (PageFlowBean)adfctxt.getPageFlowScope().get("pageFlowBeanName");
With these 3 approaches in mind it’s interesting to gather some statistics on how long it takes each method to retrieve each type of bean. The following chart shows 5 consecutive runs of each method, per bean type, where each method is repeated in a loop 10000 times (so we can see the statistical differences).

(Note each run included an initialization section that wasn’t recorded in the statistics, designed to prime the beans and the access methods such that startup times didn’t impact the results).

The numbers represent nanoseconds but their individual values mean little. However the ratios between each method is of more interest and the following conclusions can be made:

a) The older createValueBinding method is slower than the evaluateExpressionGet method, at least initially but this trends to insignificant over subsequent runs.

b) The direct method is faster than the other methods in all cases.

c) Particular gains are to be made in using the direct method to access application, session and request scoped beans. Less so but still positive gains for view and pageFlow scoped beans.

Sample App

The sample app can be downloaded from here.

Platform

MacBookPro 2.3GHz Core i7, 8GB RAM, Mac OS X 10.6.8
JDev 11.1.2 JDK 64bit 1.6.0_26

Thanks

My thanks must go to Simon Lessard who inspired this post sometime back.

Wednesday, 1 September 2010

Master-child BTF chaperone – a contextual event alternative

Inter Bounded Task Flows (BTF) communications are aided in JDeveloper 11g by the use of contextual events, a BTF publish-subscribe mechanism for passing data between BTFs. Yet in some situations contextual events may be the equivalent of "using a sledge hammer to crack a nut", where developers try and use them everywhere when there are alternative techniques available that may work just as well.

This blog documents a technique for allowing a master ADF application utilising the ADF UI Shell to provide services to a child BTF, including passing data backwards and forwards, without the use of contextual events. While the blog demonstrates a solution within context of the ADF UI Shell, the overall technique should be useful in other ADF solutions.

It needs to be clearly highlighted at the beginning of this post this is just a single technique that has use in certain circumstances, it's not a replacement for all the different ways contextual events can be used. The reader should take care to read the full blog post then conduct a post analysis where this technique would be useful.

Preamble

Readers working with the ADF UI Shell will hopefully be familiar with Pino Jeddah's excellent work in documenting different methods of integrating BTFs into the shell. Recently Pino was inspired by a post I wrote to the OTN forums ADF UI Patterns and Best Practices. In this post I described a problem I was having with the ADF UI Shell, namely how to combine the ADF UI Shell's "dirty tab" functionality with a self-closing standalone BTF. Pino devised an excellent solution and blogged about it showing a very interesting technique with contextual events. I recommend all readers interested in contextual events and inter BTF communications check it out.

While pondering the problem I stumbled across a new technique demonstrated in this blog. The technique is inspired by my work with the ADF UI Shell, but should be general enough that it can be used in other ADF domains.

Problem Description

One of the guiding features of ADF via JDeveloper 11g that influences application design is task flows. Typically a master ADF application is made up of one Unbounded Task Flow (UTF) calling multiple Bounded Task Flows (BTF). Ideally to maximise reuse, the BTFs should be built in such a fashion that they are totally agnostic of how and who consumes them. This ideal would allow BTFs to be reused by different master ADF applications, essentially a set of reusable loosely coupled services (along the lines of Avrom Roy-Faderman's ideas of SOA in ADF for extreme reusability).

Yet dependent on the design challenge at hand, there are times when the child BTF needs to communicate with its caller. Maybe there's the need to pass data backwards and forwards, or possibly there's services that the child BTF requires that only the calling application can provide.

To make this example real, consider the following.

Imagine a master ADF application based on the ADF UI Shell that allows users to search for departments, and then in a new separate tab either view details about the selected department or separately view a list of employees. Essentially each BTF spawns another leaving the previous open, and within the ADF UI Shell the user manages the opening and closing of the BTFs through the UI Shell tabs feature.

Decomposing these requirements into an ADF solution, our end solution will be:

a) A master ADF application to call the Search Departments BTF
b) A Search BTF that opens either the Departments BTF, or the Employees BTF
c) A View Departments BTF accepting a department ID, showing the specific department's details
d) A View Employees BTF also accepting the department ID, showing the employees relating to the department


To maximize reusability the Search BTF, Departments BTF and Employees BTF will all be built as standalone ADF Libraries, consumed by the master ADF application through JDeveloper's Resource Palette. This allows the resulting BTFs to be used by other master ADF applications beyond the current master.

Yet our goal of reusability is partially compromised as the Search BTF is hardcoded into calling the Departments BTF or the Employees BTF, they are effectively tightly coupled, the enemy of reusability. Who is to say in the future that a new master ADF application may want to make use of our sophisticated Search BTF, but display entirely different BTFs when the user selects a record? To maximize reusability, depending on the master ADF application consuming the Search BTF, we need some sort of mechanism to allow the master ADF application to plug in functionality into the Search BTF such that alternative BTFs can be opened, yet the specific BTFs aren't hardcoded into the Search BTF.

Assumptions

For purposes of keeping this blog entry short, we'll only consider the artifacts to be created in the master ADF application and the Search BTF. We won't consider how to create the master ADF application based on the ADF UI Shell, nor how to create the Search BTF itself – it is expected readers are familiar with these concepts and how to build them.

As a complete exercise the technique detailed here could be extended to the Department BTF and Employees BTF. Yet detailing the solution for the master ADF application and the Search BTF application is enough to describe the technique and then readers need just extend it to the other BTFs. A sample application is available at the end of this post that pulls them altogether.

Solution – Search BTF

For the Search BTF the solution requires the following artifacts:

* A fragment displaying the departments, including two commandButtons to open either the Department or Employees BTF:


emptyText="#{bindings.DepartmentsView1.viewable ? 'No data to display.' : 'Access Denied.'}"
fetchSize="#{bindings.DepartmentsView1.rangeSize}" rowBandingInterval="0"
selectedRowKeys="#{bindings.DepartmentsView1.collectionModel.selectedRow}"
selectionListener="#{bindings.DepartmentsView1.collectionModel.makeCurrent}" rowSelection="single" id="t1"
columnStretching="column:c2">
headerText="#{bindings.DepartmentsView1.hints.DepartmentId.label}" id="c2">


headerText="#{bindings.DepartmentsView1.hints.DepartmentName.label}" id="c1">


* An interface class containing two stubbed methods for opening the Department BTF and the Employees BTF respectively:

package searchbtf.view;

public interface SearchBTFInterface {

public void openDepartment(oracle.jbo.domain.Number departmentId);

public void openEmployees(oracle.jbo.domain.Number departmentId);
}
* A task flow parameter based on the interface:

Name: pSearchBTFImpl
Class: searchbtf.view.SearchBTFInterface
Value: #{pageFlowScope.pSearchBTFImpl}

* A request bean to capture the fragment commandButton events:

package searchbtf.view;

import javax.el.ELContext;
import javax.el.ExpressionFactory;
import javax.el.ValueExpression;

import javax.faces.application.Application;
import javax.faces.context.FacesContext;
import javax.faces.event.ActionEvent;

import oracle.adf.model.BindingContext;
import oracle.adf.model.binding.DCBindingContainer;
import oracle.adf.model.binding.DCIteratorBinding;

import oracle.jbo.Row;

public class ViewDepartments {
public ViewDepartments() { }

// Resolve EL expression - sourced from JsfUtils from Oracle Corp
public static Object resolveExpression(String expression) {
FacesContext facesContext = FacesContext.getCurrentInstance();
Application app = facesContext.getApplication();
ExpressionFactory elFactory = app.getExpressionFactory();
ELContext elContext = facesContext.getELContext();
ValueExpression valueExp = elFactory.createValueExpression(elContext, expression, Object.class);
return valueExp.getValue(elContext);
}

public SearchBTFInterface getSearchBTFInterface() {
SearchBTFInterface searchBTFInterface = (SearchBTFInterface)resolveExpression("#{pageFlowScope.pSearchBTFImpl}");
return searchBTFInterface;
}

public oracle.jbo.domain.Number getDepartmentId() {
DCBindingContainer bc = (DCBindingContainer)BindingContext.getCurrent().getCurrentBindingsEntry();
DCIteratorBinding iterator = bc.findIteratorBinding("DepartmentsView1Iterator");
Row currentRow = iterator.getCurrentRow();
oracle.jbo.domain.Number departmentId = (oracle.jbo.domain.Number)currentRow.getAttribute("DepartmentId");
return departmentId;
}

public void openDepartment(ActionEvent actionEvent) {
oracle.jbo.domain.Number departmentId = getDepartmentId();
if (departmentId != null)
getSearchBTFInterface().openDepartment(departmentId);
}

public void openEmployees(ActionEvent actionEvent) {
oracle.jbo.domain.Number departmentId = getDepartmentId();
if (departmentId != null)
getSearchBTFInterface().openEmployees(departmentId);
}
}
Note how the openDepartment and openEmployees functions within this bean don't open the Department or Employees BTF directly. They instead grab the SearchBTFInterface as passed in as a parameter on the BTF from the calling application, and calls the defined methods of the interface class.

* Modify the original commanButtons to call the bean's method:


That concludes the work within the Search BTF. What readers should understand is the Search BTF through the combination of the Java interface and the BTF parameter, is enforcing that the calling BTF supplies a concrete implementation of the interface. In other words the Search BTF is avoiding the real implementation of how to call the other Department and Employees BTF. It's leaving the actual implementation to the caller (which will be the master BTF application in our case).

Solution – Master ADF Application

For the Master ADF Application the solution requires the following artifacts:

* The ADF Library for the Search BTF (adflibSearchBTF.jar) to be added to the Master ADF Application's ViewController project.

* An implementation of the ADF UI Shell Launcher class to open new tabs in the shell (see the following zip file from Oracle to see an example of the Launcher class)

package masterapp.view;

import java.util.HashMap;
import java.util.Map;

import javax.faces.event.ActionEvent;

import oracle.ui.pattern.dynamicShell.TabContext;


public class Launcher {

private TabContext tabContext;

public Launcher() {
this.tabContext = (TabContext)JsfUtils.resolveExpression("#{viewScope.tabContext}");
}

public void openSearch(ActionEvent ae) {
openSearch();
}

public void openSearch() {
Map parameterMap = new HashMap();
parameterMap.put("pSearchBTFImpl", new SearchBTFChaperone());
launchActivity("Search", "/WEB-INF/SearchBTF.xml#SearchBTF", true, parameterMap);
}

public void openDepartments(oracle.jbo.domain.Number departmentId) {
Map parameterMap = new HashMap();
parameterMap.put("pDepartmentId", departmentId);
launchActivity(this.tabContext, "Department", "/WEB-INF/DepartmentBTF.xml#DepartmentBTF", true, parameterMap);
}

public void openEmployees(oracle.jbo.domain.Number departmentId) {
Map parameterMap = new HashMap();
parameterMap.put("pDepartmentId", departmentId);
launchActivity(this.tabContext, "Employees", "/WEB-INF/EmployeesBTF.xml#EmployeesBTF", true, parameterMap);
}

protected void launchActivity(TabContext tabContext, String title, String taskflowId, boolean newTab) {
try {
if (newTab) {
tabContext.addTab(title, taskflowId);
} else {
tabContext.addOrSelectTab(title, taskflowId);
}
} catch (TabContext.TabOverflowException toe) {
toe.handleDefault();
}
}

protected void launchActivity(TabContext tabContext, String title, String taskflowId, boolean newTab, Map parameters) {
try {
if (newTab) {
tabContext.addTab(title, taskflowId, parameters);
} else {
tabContext.addOrSelectTab(title, taskflowId, parameters);
}
} catch (TabContext.TabOverflowException toe) {
toe.handleDefault();
}
}

protected void launchActivity(String title, String taskflowId, boolean newTab) {
launchActivity(this.tabContext, title, taskflowId, newTab);
}

protected void launchActivity(String title, String taskflowId, boolean newTab, Map parameters) {
launchActivity(this.tabContext, title, taskflowId, newTab, parameters);
}
}
For those familiar with the ADF UI Shell Launcher class and the launchActivity method, note the subtle difference in this implementation. Essentially a local variable keeps a reference to the UI TabContext class, and used in the launchActivity methods. This is required because when the Search BTF indirectly calls the launchActivity methods via the concrete implementation of the interface passed from the master application, TabContext is outside the child BTF's scope. In turn the Launcher bean must remain in the master ADF application sessionScope such that the TabContext isn't flushed on each request.

* A concrete implementation of searchbtf.view.SearchBTFInterface that is not available to the Master ADF Application:

package masterapp.view;

import oracle.jbo.domain.Number;

import searchbtf.view.SearchBTFInterface;


public class SearchBTFChaperone implements SearchBTFInterface {

public SearchBTFChaperone() { }

public Launcher getLauncher() {
Launcher launcher = (Launcher)JsfUtils.resolveExpression("#{launcher}");
return launcher;
}

public void openDepartment(Number departmentId) {
getLauncher().openDepartments(departmentId);
}

public void openEmployees(Number departmentId) {
getLauncher().openEmployees(departmentId);
}
}
As can be seen the Chaperone class simply grabs the Launcher class and calls the associated methods for opening the BTFs.

The complete result is at runtime the master ADF application's Chaperone class with the concrete implementation on how to call the other BTFs is passed to the Search BTF. The Search BTF is aware of the available methods as it defined the interface class that the master Chaperone class was based on. The end effect is the Search BTF defines a set of required services it wants the calling application to supply and implement.

That concludes the work required for the master ADF application.

Sample Application

The sample application using Oracle's HR sample schema can be downloaded as a zip, containing all 4 applications, the master ADF application, Search BTF, Employees BTF and Department BTF. Note that the 3 BTFs deploy their ADF Libraries into a lib directory of the master ADF application, which in turn attaches the JARs to it's ViewController project.

Conclusion

The master-child BTF chaperone approach is an alternative technique to contextual events where the child BTF requires services from its caller, but isn't interested in the implementation. This allows a relatively lighter coupling that assists BTF reusability. The technique isn't a replacement for contextual events in all cases, but should highlight to developers an alternative mechanism for achieving communications between BTFs.

Addendum

Tested under JDev 11.1.1.2.0 build 5536.

Sunday, 8 August 2010

JDev 11g: Programmatic Contextual Events

This post is yet another Contextual Event blog description with a slight programmatic twist. It was inspired by Lucas Jellema's OTN forum post on how to raise programmatic Contextual Events, and in addition uses techniques as demonstrated by Pino and Frank described below.

Readers might be interested in a thread on the ADF EMG about the design of Contextual Events in the ADF framework, and the idea of Implicit Contextual Events - The Rise and Rise of Contextual Events (or the birth of Implicit Contextual Events).

In that ADF EMG thread I allude to a near "million blogs" that already describe Contextual Events as supporting collateral for Oracle's documentation. If you're interested in other posts check out Pino Jeddah's or Frank Nimphius's screencasts.

While I certainly find the screencasts informative, for my own documentation purposes this blog lists out the whole set of steps 1 by 1. Once again readers hopefully will find it useful.

The point of the programmatic Contextual Event solution is to move away from a declarative approach which isn't ideal in all cases. In our specific use case we wanted programmatic control over the payloads between the publisher and consumer. In turn as of JDev 11.1.1.2.0 I'm not yet satisfied with the IDE's support for Contextual Events and payloads via the pageDef binding design editor; a code solution provides a level of transparency when coupled with the debugger.

It's worth pointing out from Lucas's OTN forum post this programmatic solution is only a half way house, it still requires an "event" binding in the relating pageDef files, however the event payloads themselves are dynamic and fully configurable in code.

Contextual Event Definitions

For the purposes of this blog entry, I'll be describing the 2 players in the Contextual Event scenario as the "Publisher" and the "Consumer".

The Contextual Event "Publisher" will be a standalone Bounded Task Flow (BTF) comprised of page fragments, that has been JARed as an ADF Library. We'll refer to this as the PublisherBTF. The PublisherBTF will be comprised of a single BTF with a single page fragment "PublisherPageFragment" containing a single button to raise events – very simple.

The Contextual Event "Consumer" will be a master ADF application, or in other words an application that calls the "PublisherBTF" and embeds it in a region within a page. We'll refer to this as the ConsumerMasterApp.

Goal

The goal for this blog is to demonstrate when a button is pressed in the PublisherBTF, a programmatic Contextual Event is raised via the button's ActionListener, with some coded payload, that the event is captured and handled by the ConsumerMasterApp. At the result of this blog, the payload itself is immaterial, it's the technique that's important.

Preparing the PublisherBTF

In this section I describe the setup of the PublisherBTF before we address configuring the solution for Contextual Events. As such I wont go through step by step setup instructions, I assume readers are familiar with the basics described here.

The PublisherBTF is a standard ADF Application, comprised of a Model & ViewController project. In turn the ViewController contains a single BTF "PublisherBTF.xml" containing a single fragment "PublisherPageFragment".


The BTF has only the fragment:


The fragment is comprised of the following code:


As can be seen the button via it's ActionListener refers a JSF bean "publisher" configured as follows:


The PublisherBean's doAction() method is where we'll raise the Contextual Event programmatically as described in the next section. Currently the method does nothing:

package view;

import javax.faces.event.ActionEvent;

public class PublisherBean {
public PublisherBean() {
}

public void doAction(ActionEvent actionEvent) {
// Add event code here...
}
}
Finally the PublisherPageFragment requires a relating pageDef bindings file, created by right clicking the open fragment in the design or editor mode, and selecting Go to Page Definition using the resulting dialog to generate the empty bindings file:


Raising the Contextual Event Programmatically from the PublisherBTF

Our goal is to raise the Contextual Event via the commandButton's doAction method() programmatically. A requirement for the code is that we have an Event binding published in the relating page fragment's pageDef file.

The easiest way to do this is to select the commandButton in the page fragment, then via the Property Inspector locate the subsection entitled Contextual Events, and select the green plus button, opening the Publish Contextual Event dialog:


From here we enter a name "publisherEvent". In the JDev 11.1.1.2.0 and 11.1.1.3.0 releases this dialog appears to have a fault in that it doesn't populate the Type field. Implicitly it should know if we're creating events from commandButtons the Type should be "Action Event" (or "Value Change Event" for fields). This may work in later releases, here I've just entered the text.

The result of this operation is a little hard to see in the pageDef designer. Instead the Structure Windows shows a "eventBinding" containing an "events" binding with one "event" binding called "publisherEvent" are created on your behalf:


For the record the relating pageDef XML code:


Package="view.pageDefs">


Note the ActionListener class in the eventBinding; we'll be raising the event from a commandButton so this configuration is important. In the example above I've also changed the eventBindings id from the default value "eventBinding" to "publisherEventBinding". This will make it easier to understand what's happening in our upcoming programmatic code.

From creating the eventBinding, the actionListener property of the commandButton will have been modified to call the eventBinding directly. We don't want this as we want to programatically raise the event. As such restore the original EL expression to call the PublisherBean's doAction method:

At this point this establishes the bindings required for raising the event. On returning to the PublisherBean's doAction() method, the following custom code demonstrates retrieving the eventBinding, setting up a payload and raising the event programmatically:

package view;

import java.util.Map;

import javax.faces.component.UIComponent;
import javax.faces.event.ActionEvent;
import javax.faces.event.ActionListener;
import oracle.adf.model.BindingContext;
import oracle.binding.BindingContainer;
import oracle.jbo.uicli.binding.JUEventBinding;

public class PublisherBean {
public PublisherBean() {
}

public void doAction(ActionEvent actionEvent) {

UIComponent component = actionEvent.getComponent();
Map; attributes = component.getAttributes();

attributes.put("someParameter", "A String Value");
attributes.put("anotherParameter", Integer.valueOf(1234));

BindingContainer bindingContainer = BindingContext.getCurrent().getCurrentBindingsEntry();
JUEventBinding eventBinding = (JUEventBinding)bindingContainer.get("publisherEventBinding");

ActionListener actionListener = (ActionListener)eventBinding.getListener();
actionListener.processAction(actionEvent);
}
}
(Post edit: the syntax highlighter Javascript I'm using to display the above code is unfortunately introducing a syntax error at the bottom. Ignore the </string,> annotation after the last ellipse bracket closing the PublisherBean class. Thanks to Zeeshan for pointing this out)

In this code the technique to raise the event and pass a variable payload is:

a) Retrieve the commandButton that raised the actionEvent as an UIComponent
b) Retrieve the UIComponent's attributes
c) Add 2 arbitrary attributes, in this case a String and Integer

This establishes the payload to send. What you send in terms of attribute names and data types is your choice. You could augment this code to fetch data from other value bindings, call Java code, whatever you need to do to get the data.

On completing this we move onto raising the event programmatically:

d) Fetch the page fragment's BindingContainer
e) Retrieve the eventBinding by it's id "publisherEventBinding" – note this maps back to the eventBinding id we changed in the pageDef file
f) Retrieve the eventBinding's ActionListener – this was also configured in the eventBinding in the pageDef file
g) Execute/process the action

This concludes the configuration of the PublisherBTF for raising events.

Preparing the ConsumerMasterApp

Similar to the PublisherBTF, in this section I'll describe the required skeleton of the consuming master ADF application. I'll assume readers are familiar with the basics without describing everything step by step.

The ConsumerMasterApp contains a standard Model/ViewController project setup with a single JSF page in the ViewController called ConsumerPage.jspx.

The PublisherBTF ADF Library JAR will be attached to the ConsumerMasterApp's ViewController project.

The ConsumerPage.jspx will have the PublisherBTF embedded in the page as a region as follows:


xmlns:h="http://java.sun.com/jsf/html" xmlns:af="http://xmlns.oracle.com/adf/faces/rich">


Consuming the Contextual Event Programmatically in the ConsumerMasterApp

To configure the ConsumerPage to receive the event, we need:

a) a binding to receive the event and pass it to the handler method
b) a handler, essentially a Java class method to receive the event from the binding

To do this we create the handler first, then the binding to call the handler, then we back fill the handler's method code to retrieve the data.

To create the Handler, in the ConsumerMasterApp we create a bean ConsumerBean as follows:

package consumer.view;

public class ConsumerBean {

public void handleEvent(Object payload) {
// Add handler code here....
}
}
Note the handleEvent() method we've also added, this will eventually be called via the binding to allow us to programmatically handle the event.

The event binding requires that the handler be exposed as a Data Control. This is done by right clicking the ConsumerBean in the Application Navigator and selecting the Create Data Control option:


From this operation an xml file is created for the relating Data Control, and under the Data Control accordion in the Application Navigator, you will now see the ConsumerBean exposed (if you don't, click the refresh button in the Data Control accordion):


Finally to configure the handler, on the consuming page we create a methodAction binding in the resulting pageDef. This is done by selecting the Bindings and Executables tab, then the green plus button invoking the Insert item dialog where we select methodAction:


In the resulting Create Action Binding dialog, select the ConsumerBean Data Control, then the handleEvent() operation, leaving all else as default:


Selecting ok creates the associated methodAction binding:


Given we now have a handler to receive the event, we configure the ConsumerPage's bindings to subscribe to the PublisherBTF's event. To do this we open the ConsumerPage's pageDef file, selecting the Contextual Events tab, followed by the Subscribes tab and the green plus button. This opens the Subscribe to Contextual Event dialog where we will select the event to subscribe to, and the handler to action the received event:


Selecting the Looking Glass button on the Event field allows us via the resulting Select Contextual Event dialog to select the event "publisherEvent" from the PublisherBTF. Note it's possible to select the event from both the embedded PublisherBTF within the region of the ConsumerPage, or the event from the ADF Library. As the BTF has already been configured in the ConsumerPage, use the former:


On returning to the Subscribe to Contextual Event dialog the Type field will now map to an Action Event. As the "publisherEvent" name might not be unique across all BTFs you consume, you can filter the event by specifically specifying the BTF that raised it via the Publisher poplist:


If you select "Any", by design regardless of the BTF that raises the "publisherEvent", your handler will be called. We'll take the Any option for this simple example.

Next selecting the Handler button, from the Select Handler dialog we can select the handleEvent method we exposed as a methodAction binding:


Returning to the Subscribe to Contextual Event dialog, under the Parameters tab we create the following entry:


What this entry does is map the generic incoming data payload to the parameters of the handler method. Note the Name of the parameter is lowercase "payload" that matches to the ConsumerBean handleEvent() method's input parameter name. The IDE gives you no support in getting this correct, so it's up to you to make them match. In addition note the EL expression "#{payLoad}". Again notice the words are lowercase but there is a capital "L". Again the IDE gives you no support in getting this correct. I had a bit of whine about this in a previous blog post. Note if you get these wrong, the runtime behaviour is the event will still be called, yet no payload will be passed, which is a bit of a pain to debug.

For reference what you'll see in the pageDef designer:


And the resulting pageDef code:


Package="consumer.view.pageDefs">


xmlns="http://xmlns.oracle.com/adf/controller/binding"/>


RequiresUpdateModel="true" Action="invokeMethod" MethodName="handleEvent" IsViewObjectMethod="false">


At this point we've the handler configured, we've subscribed to the event, and on the event being called the handler will be called on our behalf. What's left is for us to add our code to the ConsumerBean handleEvent() method:

package consumer.view;

import javax.faces.component.UIComponent;
import javax.faces.event.ActionEvent;

public class ConsumerBean {

public void handleEvent(Object payload) {

ActionEvent actionEvent = (ActionEvent)payload;
UIComponent component = (UIComponent)actionEvent.getSource();

String someParameter = (String)component.getAttributes().get("someParameter");
Integer anotherParameter = (Integer)component.getAttributes().get("anotherParameter");

// Do something with the data
}
}
Of interest in the code, the payload itself is the actual ActionEvent raised via the PublisherBTF. From the ActionEvent it's possible to grab the UIComponent that raised the event, who in turn carries the data payload via its attributes. Note how we can cast the parameters/attributes back to the source class, which implies we can use sophisticated Java class constructs as parameters if required.

This concludes what needs to be setup. From here in your handleEvent() bean you're free to do whatever you need to with the data, possible write it to a binding, or pass it to another Java method and so on. In turn of course you don't even have to pass a payload, simply raising the event maybe all you require for the consuming application to do something.

Samples

The example PublisherBTF and ConsumerMasterApp ADF applications are available as a single zip. Note the ConsumerMasterApp is dependent on the ADF Library JAR generated via the PublisherBTF. You'll need to generate/deploy your own PublisherBTF ADF Library JAR, then remap the ConsumerMasterApp's ViewController ADF Library mapping to wherever the dependent JAR is located.

Conclusion

What may appear to be a lot of steps for configuring Contextual Events then handling them programmatically, actually becomes second nature after a couple of trials. Basically in the publisher you need to:

1) Create an eventBinding
2) Via a commandButton actionListener grab the eventBinding in code, attach a payload, and execute the event

From the consumer we need to:

1) Create a handler method
2) Publish the handler class as a Data Control
3) Create a methodAction binding for the Data Control
4) Subscribe to the publisher event, mapping the event and its payload to the method and its parameters
5) Returning to handler method, retrieve the parameters via the ActionEvent UIComponent

The benefit of the programmatic approach is you're now free to pass around any data payload with the flexibility of Java code. Without a doubt this doesn't replace the declarative solution to Contextual Events, but it's certainly good to know, and is much easier to debug as there's real code to place breakpoints.

Addendum

This blog entry was written against JDev 11.1.1.2.0.

Wednesday, 4 August 2010

JDev Contextual Events: PayLoad, payload, ah, payLoad

Another blog post along the lines of "this caught me out, cost 2hours of debugging, hopefully you'll learn from my mistakes".

JDev 11g readers will be familiar with the concept of contextual events, a powerful addition that allows task flows embedded in regions to communicate with each other, passing data payloads back and forwards.

Oh, did I say payloads? I meant pay-loads, or is that pay loads? Let's try Pay Loads. Geez what's the difference?

What am I on about?

Within the contextual event framework, effectively there is a "producer" task flow and a "consumer" task flow. The producer publishes a contextual event, and the consumer subscribes to the contextual event. It's all rather handily described in Section 28.7.1 of the Fusion Guide How to Create Contextual Events Declaratively

The publisher can pass a data payload (payLoad, PayLoad, um, pay load?) to the consumer. The publisher users an EL expression to extract data from their local bindings to do this, maybe something like #{bindings.employeeNo.inputValue}, which would be familiar to ADF programmers. The consumer however needs to use an EL expression #{payLoad} to capture the data from the published event.

Now to be specific here the EL expression is "pay" all lowercase, then "Load" with a capital "L" lowercase "oad", not "payload" all in lowercase.

What's the big deal? Well if you do anything else like #{payload} or #{PayLoad}, while the consumer will receive the published contextual event, unfortunately no data gets passed. Of course that's expected behaviour because EL is case sensitive and for whatever ADF internal code is calling behind the scenes, it can't resolve the Java routine name to lookup.

However the problem for developers is, in the English language if you search numerous dictionaries, you'll find the term is "payload", not two words "pay" and "load". It's therefore not intuitive for developers, something people I think will make a mistake on particularly when you read the examples where capital L looks very similar to a lowercase l anyway, and unfortunately, in JDev 11.1.1.2.0 (at least where I tested this) the IDE gives you no warning that you've got it wrong at design time.

So hopefully for readers, forewarned is forearmed (or is that forewarned is forearmed?), and you wont waste an afternoon trying to get something that is in essence very simple to work.

Friday, 5 February 2010

ADF Faces RC: af:document uncommittedDataWarning property

Thanks to some assistance from Richard Wright from Oracle Corp on the OTN forums a week or so ago, I learnt about the uncommittedDataWarning property in the af:document tag, which I'd like to describe in this post.

This property is useful in the following scenario. Imagine you have a page as follows:


As you can see the page allows the user to change values of the current employee, and behind the scenes this is based on the usual ADFm bindings. In turn note the 3 buttons and their labels. For this screen there is a strict requirement for the developer to either Commit their changes or Undo them, before navigating back to the Home page.

Before the introduction of the uncommittedDataWarning property, the user could select the Go Home button and bypass this requirement. A workaround would be to set the Go Home button's disabled property such that the user couldn't navigate through the button if there were changes to be saved. However this is easily defeated by the user hitting the browser's back button, with the ensuing "JBO-35007: Row currency has changed since the user interface was rendered" mess that confuses users and developers no end.

With the introduction of the uncommitedDataWarning property for the af:document tag, and setting it to "on", if the user selects either the Go Home button (assuming we haven't disabled it) or the browser's back button without committing or undoing their work, they'll see the following browser error:


The dialog gives the user the option to Cancel, which leaves them on the current page, or Ok, which allows them to complete their action.

This is definitely an interesting feature, especially with its browser back button support.

One thing to note is that it only works for data that goes through the ADF binding layer. As such if you've JSF components based on a bean that isn't exposed to the ADF layer through a data control, it won't capture the data change. Thus this is another reason to ensure you don't hack code into the JSF layer, but expose it all through ADF Business Components or the other supported business service layer in ADF.

Also at this time the feature has a couple of limitations worth mentioning:

1) If the dialog displays and the user selects ok, the dialog will continue to display on each further page navigation until the user either commits or rolls back their changes. I can imagine this will become confusing or frustrating for some users, especially if you don't provide commit/rollback buttons on other pages.

2) As noted in this OTN post, I note that it is a warning mechanism and not an error mechanism (or at least, it doesn't have an option to enforce no navigation). It would seem ideal, especially with its back button functionality, to display an error only, leaving the user on the same page and forcing them to do a commit. Obviously this wouldn't be ideal in all cases, but certainly in some. I've raised ER 9299581 with Oracle Support for this.

3) As Richard Wright points out in the same post, "for a similar use case there has been a request to allow the user to continue with either a commit or rollback from the dialog. It would be analogous to the "Save" dialog received when exiting a native app (e.g., Word, Excel, JDev)." Hopefully we'll see these ERs in a future release.

I'm not overly sure when this property became available but I'm guessing the original JDev 11g release. It's definitely available in 11gR1 which this post was written against.

Monday, 14 December 2009

ADF UI Shell + ADF Security

This post covers off combining the new ADF UI Shell and ADF Security. Recently Oracle released the UI Shell based on the Oracle Dynamic Tabs Shell for JDeveloper 11g Release1 (aka PS1). I blogged about my initial research around the UI Shell here, and you can follow others' questions and answers on the ADF UI Patterns & Best Practices OTN forum.

It's important for me to note that both my original post and this post constitute my learnings, have not been tested in a production system, they could contain errors. As such your mileage may vary and it's important you do your own testing.

The UI Shell is an interesting concept in that it dictates your application will be composed of separate subsystems, each made up of a number of activities (aka. bounded task flows). The bounded task flows can in turn be shared by the subsystems.

What I wanted to consider in this post is what are the minimum requirements in applying ADF Security, or in other words, what permissions do we need to give to each of the design time parts in order to allow authenticated users to access the application. To discuss this I thought I'd base my example on the UI Shell demonstration application as detailed in the Oracle UI Shell Functional Pattern whitepaper.

In understanding how to apply ADF Security to the UI Shell example application we first need to identify all the moving parts that we need to apply security against:

1) In the UI Shell example application the application is divided into 3 subsystems, namely First, Second and Third. From a design time point of view each of these has an associated page First.jspx, Second.jspx and Third.jspx respectively.

2) In turn the First subsystem has a "welcoming" task flow comprised of a single page fragment called you.jsff. Potentially each subsystem can have its own welcoming task flow with page fragment, though in the example only one exists.

3) The First subsystem makes use of three activities (aka. bounded tasks flows using page fragments) called first, second and third (note the case difference, don't get these confused with the subsystem names which are initcapped), that in turn are simple bounded task flows using a single page fragment one.jsff, two.jsff and three.jsff respectively. The three activities are backed by task flow files first.xml, second.xml and third.xml.

With this in mind let setup a security scenario where we want to allow a user to access the First subsystem and all the associated activities, but not parts of the Second and Third subsystems.

The following steps describe the actions required in doing this:

1) You must first enable ADF Security for your application via the Application -> Secure -> Configure ADF Security menu option that invokes the Configure ADF Security wizard. As this wizard has been described in numerous other blogs I'll paraphase the options here:

Step 1 of 5

ADF Authentication and Authorisation

Step 2 of 5

Web Project: ViewController.jpr
Form-Based Authentication
Login Page: /login.html
Error Page: /error.html

Step 3 of 5

No Automatic Grants

Step 4 of 5

No options (Leave Redirect Upon Successful Authentication unselected)

Step 5 of 5

n/a

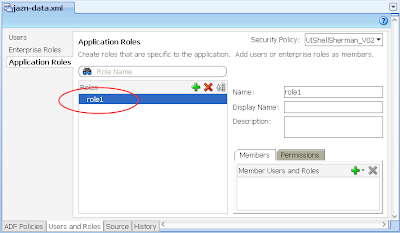
2) Via Application -> Secure -> Application Roles, configure a single Application Role "role1"


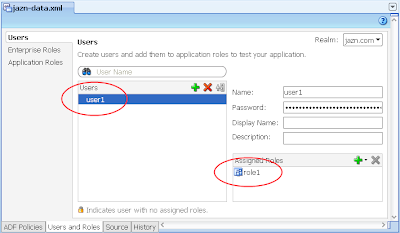
3) In the same jazn-data.xml editor, select the Users options on the left, then configure a single user "user1" and allocate them to "role1" Application Role you created in the last step.


---

What we need to from here is allocate basic access rights to the moving parts of the UI Shell that aren't specific to any subsystem. In other words the parts of the UI Shell that are shared by all subsystems regardless of the type of user.

You have a choice to make here. If you want your basic application to be available to any user regardless if they've authenticated (ie. logged in) or not, then in the following step you need to grant the "anonymous-role" privilege. Alternatively if you want your users to have to at least log in before accessing any part of the system, then you need to grant the "authenticated-role" privilege. If you're unfamiliar with these concepts please read the Oracle documentation. For this post I'll assume the "authenticated-role" privilege.

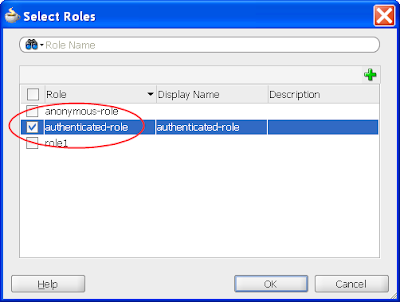
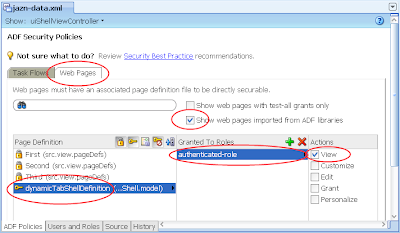
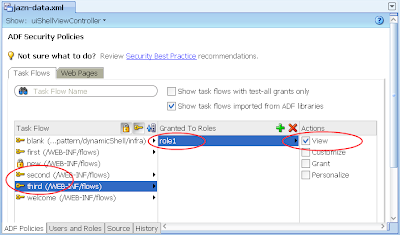
4) In the same jazn-data.xml editor, select the ADF Policies tab at the bottom. Select the Web Pages tab. Ensure the "Show web pages imported from ADF libraries" checkbox is selected. Under the Page Definitions table column select the dynamicTabShellDefinition option, then the green plus button in the "Granted to Roles" column, and select the authenticated-role role in the Select Role dialog:


The result in the jazn-data.xml will be:


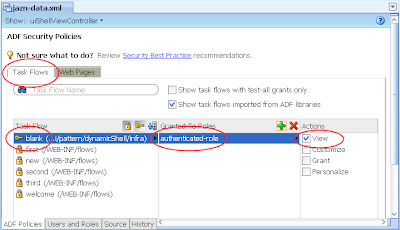
5) In the same jazn-data.xml editor with the ADF Policies tab still selected at the bottom, select the Tasks Flow tab. Ensure the "Show task flows imported from ADF libraries" checkbox is selected. Similar to the last step allocated the authenticated-role in the Select Role dialog to the "blank" task flow. The result:


---

From here we want to allocate the user1 with role1 privileges against the First subsystem.

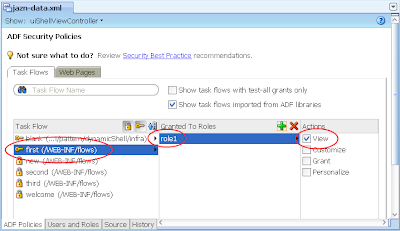
6) In the same jazn-data.xml editor with the ADF Policies tab and Tasks Flow tab open, allocate the role1 to the "first" task flow. The result:


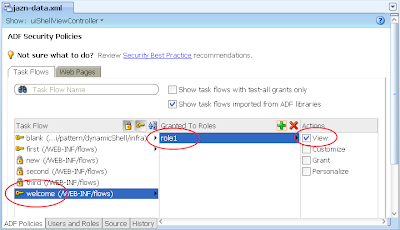
7) Ditto, allocate role1 to the "welcome" task flow. The result:


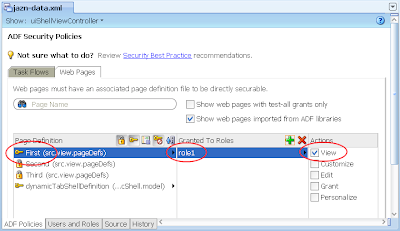
8) Switch back to the Web Pages tab, then allocate role1 to the First page:


---

At this stage if you run your application, you'll note on accessing the First page the user will be hit with the login box straight away. A successful login lands on the First page showing the First subsystem.


If you click on one of the other main tabs such as Second App, the running page will return the following error message as expected as we haven't allocated user1 priviliges to the Second subsystem:

ADFC-0619: Authorization check failed: '/Second.jspx' 'VIEW'.

Ideally to stop this occurring we need to either disable or set the Second App tab's rendered property to false, through the following EL expression:

#{!securityContext.userInRole['role2']}

The result:


You'll need to make this change to every tab into every subsystem's page (First.jspx, Second.jspx, Third.jspx).

---

If we now open the first activity in the First subsystem page we get:


Yet if we open the second activity we get the following empty content:


This is to be expected as we haven't allocated the second.xml (or even the third.xml) to the role1 privilege. As back in step 6, allocate role1 against these under the jaxn-data.xml editor, ADF policies tab, Task Flow tab:


Alternatively if you don't want these activities available to role1, instead change the commandLink's to disable or un-render properties as per the EL securityContext example above.

--

In conclusion we see the UI Shell works pretty seamlessly with ADF Security, with the small caveat that you need to know which parts of the UI Shell to grant privileges to all users/roles.

Monday, 30 November 2009

ADF 11gR1 – UI Shell – Oracle Dynamic Tabs Shell

In the latest release of JDeveloper, specifically 11.1.1.2.0 also known as 11g Release 1 also known as Patch Set 1 also known as 11g build 5536 also known as the Shepherd build (cough cough Oracle), Oracle has included a new built in page template known as the "Oracle Dynamic Tabs Shell". This template is part of Oracle's ADF Functional Patterns and Best Practices efforts, also referred to as the "UI Shell". Complete documentation is available here. I'll leave readers unfamiliar with the UI Shell to read Oracle's documentation to understand the basics.

With my current client we're happy with the inclusion of this new UI Shell and we can actively see ourselves using it in the near future. What I wanted to document is my own thoughts and research which may be of use to others, and I hope to further the discussion on the ADF EMG. Note as usual your mileage may vary so take time out to check the facts listed here:

1) The Create JSF Page dialog presents the "Oracle Dynamic Tabs Shell" page template option:


2) The template and its supporting classes are installed in <jdev_home>/jdeveloper/adfv/jlib/oracle-page-templates-ext.jar, though the JDev IDE takes care of importing the template and classes/libraries into your project for you once selected in the Create JSF Page dialog. As the following picture shows an additional library Oracle Extended Page Templates is added to your project:

Side note: Steve Muench has blogged the location of the UI Shell template and supporting classes as a separate download here. This will allow you to take the default UI Shell template and customise to your needs if required. See further points below for why this may be necessary.

2) Our technical team was already getting bogged down in "discussions" of "standard" web page layouts versus RIA layouts. The technical team knows the standard web page layouts weren't suited to RIA applications, but it was hard to argue our case without actually creating a RIA layout. In turn creating a RIA layout that we were happy with was going to take some time, and we're building applications now. With the UI Shell we can short cut the layout "discussions", say this is what Oracle's provided us, it works well and this is what we'll use, allowing us to focus on the more important matter of hand and that's writing the ADF solution for the business.

3) Our overall application is made up of several subsystems (think Oracle Apps with HR, Procurement, Payroll etc). Within the UI Shell the globalTabs facet provides an ideal location to list the subsystems allowing the user to switch between each module:

4) Each subsystem gets its own page based on the template, as in hr.jspx, procurement.jspx and payroll.jspx based on our example.

5) The rest of the application is made up of a number "Activities" that in essence are bounded task flows using page fragments, or in other words the business processes of your application. Each subsystem is free to make use of as many bounded task flows as it sees fit, and in addition a bounded task flow can be used (shared) by many of the subsystem pages.

6) As per the previous point, if you're using the default UI Shell provided through JDeveloper rather than downloading the UI Shell as per Steve Muench's blog above, and you wish to have a common element in every page using the template, you'll need to code them in every page which isn't ideal. The solution is to download Oracle's template and customise it within your own application (or possibly create a number of declarative page components for repetitive content, though this will still require you to load each page component in each page based on the UI Shell template).

7) A key feature of the UI Shell as described in its other name "Oracle Dynamic Tabs Shell" is it shows under each subsystem how to launch a bounded task flow (aka Activity) one or many times:

This may not be ideal for every application, but my current client has a scenario in an existing Oracle Forms application where users open up to 4 sessions. While we're not sure on building an ADF equivalent with a chance to redesign the users' workflow will they still need to do this, if they do we're envisaging that each session can now be as a separate UI Shell Activity under the subsystem page.

8) As discussed in the following ADF EMG thread the UI Shell makes a great addition to the "Master JDev Application Workspace" proposed by Todd Hill bringing a number of composite ADF bounded task flows together.

9) The demonstration UI Shell application shows a basic mechanism of stopping a user leaving an activity once they've made "it dirty". The analogy to this is in the JDev IDE when the user changes the contents of a source file, the tab control title font becomes italic and the user is warned/prompted to save changes if they attempt to close the tab without saving.

Currently this feature should be considered a demonstration feature only as in the downloadable UI Shell demonstration application it has a number of limitations (it is a demo after all). In particular the isDirty() check is only done within a subsystem's activities. Clicking on a different subsystem tab/page doesn't invoke the isDirty() check with the appropriate warning dialog. It would be my assumption that this check would need to be coded in each specific application, reusing the isDirty() facilities provided.

10) For the logoImagePath attribute you can specify the path of the UI Shell log image, but not the size. In the turn the layout tends to assume a horizontal logo. If corporate branding is important to your organisation and they have a long vertical logo, good luck.

11) The default UI Shell has no consideration of security. For instance what subsystems are available under the globalTabs for the current user is your responsibility

12) The overall template does waste some vertical screen real-estate:

See annotations A, B and C.

A can be trimmed by setting the globalSplitterPosition attribute. At this time it doesn't look like B and C can be set in the default UI Shell. Ideally we'd want something like this:

13) The overall template is extremely small – only 74k – wow, Oracle can create something that doesn't take up an entire CD! ;-)

14) I note in the source code downloadable from Steve Muench's blog that there are a few comments that the implementation will change dependent on later updates to the ADF component set presumably available in later JDev releases (ie. see the TabContext.java REMOVE_ME_WHEN_NAVPANE_SUPPORTS_STAMPING comment).

This implies the default functionality of the UI Shell could change in the future which could have issues for your existing applications based on the UI Shell and therefore your regression testing and user experience. It may be necessary to source the UI Shell code and baseline in your code repository rather than being subjected to changes in functionality on upgrading to future JDev releases.

15) As per the UI Shell whitepaper, the 7 zillion steps to reproduce the demonstration UI Shell application do look daunting. However if you're familiar with JDev, page templates and constructing JSF pages it only takes about 20-30 minutes to run through most of the steps. In fact most steps are just setting up dummy task flows and page fragments to show some content within the produced template, nothing really to do with the template itself.

16) You'll need to remind users/analysts/managers etc that what the UI Shell gives in preconfigured layouts, saving developers time and boosting productivity, it takes away in customizable layout of the screen. This is a common point of contention in component based frameworks where a super component gives a large array of features, but the component works as the component works and cannot be easily customised without headache.

Wednesday, 2 September 2009

JDev 11gR1 - af:tree mashup – using hierarchical tables and drag n drop

This blog post demonstrates creating an ADF Faces RC af:tree component that sources its data from a hierarchical database table, and supports drag n drop of the nodes.

Both these topics have been discussed and demonstrated by other excellent bloggers, the core of this post is to bring both concepts together, with my usual own proof of concept documentation that may be useful to readers.

The ADF Faces RC support for hierarchical data sources was defined by Chandu Bhavsar.

The drag and drop support for af:trees was documented by Luc Bors.

(Definitely the kudos for this post must go to both Chandu and Luc for their posts that sparked the inspiration for mine)

Data model

In this example we'll use the following table:
CREATE TABLE organisations
(org_id NUMBER(4,0) NOT NULL
,parent_org_id NUMBER(4,0)
,name VARCHAR2(35) NOT NULL
,CONSTRAINT org_pk PRIMARY KEY (org_id)
,CONSTRAINT org_parent_fk
FOREIGN KEY (parent_org_id)
REFERENCES organisations (org_id));
Note the FK between the table and itself, essentially modelling that an organisation has sub-organisations (or agencies).

The data:
ORG_ID  PARENT_ORG_ID  NAME
------ ------------- -------------------------------
1000 (null) Sage Computing Services
1010 1000 Training Division
1030 1010 Self Study Program
1040 1010 Classroom Training
2264 (null) Australian Medical Systems
3210 (null) Conservation Society
3214 3210 Forests Division
3216 3210 Rivers Division
4394 (null) Newface cosmetics
3842 (null) Institute of Business Services
3843 3842 Marketing Services
3844 3842 Financial Services
Hierarchical af:tree

This details the steps to setup an ADF BC layer and ADF Faces RC bindings to support the af:tree with hierachical data from the organisations table, as previously described in Chandu Bhavsar post.

Note the following steps are well documented on Chandu's post, though you will find slightly more detail on creating the correct bindings below:

1) Create a Fusion Web App with an ADF BC Model project and ADF Faces RC ViewController.

Model project

2) In the Model project create an empty Application Module (AM)

3) Create an Entity Object (EO) based on your organisations table in the database.

4) Create two View Objects (VO) based off the same EM. Name the first ParentOrgView and the second LeafOrgView.

5) Modify the ParentOrgView query as follows:
SELECT Organisations.ORG_ID, 
Organisations.PARENT_ORG_ID,
Organisations.NAME
FROM ORGANISATIONS Organisations
WHERE Organisations.PARENT_ORG_ID IS NULL
6) You don't need to modify the LeafOrgView query. For completeness it's described as follows:
SELECT Organisations.ORG_ID, 
Organisations.PARENT_ORG_ID,
Organisations.NAME
FROM ORGANISATIONS Organisations
7) Create a VO Link between the ParentOrgView and LeafOrgView as follows:

Essentially:

ParentOrgView.OrgId = LeafOrgView.ParentOrgId

8) Create a second VO Link between the LeafOrgView to itself as follows:

Essentially:

LeafOrgView (source).OrgId = LeafOrgView (dest).ParentOrgId

9) Externalize the VOs through the AM using the following model:

Essentially:

ParentOrgView1
- LeafOrgView1
- - LeafOrgView2

ViewController project

10) In your ViewController project create a new blank JSF page called treeMashupDemo.jspx.

11) From the Data Control Palette drag the ParentOrgView onto the page as a tree. In the Edit Tree Binding you should see the following:

Note the first level of the tree has been defined as model.ParentOrgView.

12) For clarity when testing later, ensure both the OrgId and Name are included in the Display Attributes.

13) With the model.ParentOrgView node selected in the Tree Level Rules, select the green plus (+) button and select LeafOrgView:


14) With the LeafOrgView node selected in the Tree Level Rules, ensure both the OrgId and Name are included in the Display Attributes.

15) Again with the LeafOrgView node selected in the Tree Level Rules, again select the green plus (+) button, and select LeafOrgView__2:

Note how the Tree Level Rules only has 2 nodes, but to the right of each node is the child of the current node. Of specific interest in the hierarchical relationship between LeafOrgView and LeafOrgView__2.

16) For reference the JSF af:tree code is as follows:
<af:tree value="#{bindings.ParentOrgView1.treeModel}"
var="node"
selectionListener="#{bindings.ParentOrgView1.treeModel.makeCurrent}"
rowSelection="single"
id="t1">
<f:facet name="nodeStamp">
<af:outputText value="#{node}" id="ot1"/>
</f:facet>
</af:tree>
...the bindings look as follows:

..and the page def XML file as follows:
<?xml version="1.0" encoding="UTF-8" ?>
<pageDefinition xmlns="http://xmlns.oracle.com/adfm/uimodel" version="11.1.1.54.7" id="treeMashupDemoPageDef"
Package="view.pageDefs">
<parameters/>
<executables>
<variableIterator id="variables"/>
<iterator Binds="ParentOrgView1" RangeSize="25" DataControl="AppModuleDataControl" id="ParentOrgView1Iterator"/>
</executables>
<bindings>
<tree IterBinding="ParentOrgView1Iterator" id="ParentOrgView1">
<nodeDefinition DefName="model.ParentOrgView" Name="ParentOrgView10">
<AttrNames>
<Item Value="OrgId"/>
<Item Value="Name"/>
</AttrNames>
<Accessors>
<Item Value="LeafOrgView"/>
</Accessors>
</nodeDefinition>
<nodeDefinition DefName="model.LeafOrgView" Name="ParentOrgView11">
<AttrNames>
<Item Value="OrgId"/>
<Item Value="Name"/>
</AttrNames>
<Accessors>
<Item Value="LeafOrgView_2"/>
</Accessors>
</nodeDefinition>
</tree>
</bindings>
</pageDefinition>

Testing

On running our web page we see the following:

Note that the tree is happily showing the hierarchical data based on our tree bindings.

Adding drag n drop to the tree

The next set of functionality we wish to add is the ability to drag and drop nodes, or in our case organisations, in the tree. This involves adding support for drag n drop to the tree, as well as behind the scenes updating the dropped organisation's parent_org_id to that of the org_id of the organisation the original was dropped on.

The inspiration of this section comes from Luc Bors blog post, with slight difference in mine some of the supporting code is further spelt out:

1) As a reminder at the moment our af:tree code looks as follows:
<af:tree value="#{bindings.ParentOrgView1.treeModel}"
var="node"
selectionListener="#{bindings.ParentOrgView1.treeModel.makeCurrent}"
rowSelection="single"
id="t1">
<f:facet name="nodeStamp">
<af:outputText value="#{node}" id="ot1"/>
</f:facet>
</af:tree>
2) We then introduce a collectionDragSource and a collectionDropTarget to support the drag and drop within the tree:
<af:tree value="#{bindings.ParentOrgView1.treeModel}"
var="node"
selectionListener="#{bindings.ParentOrgView1.treeModel.makeCurrent}"
rowSelection="single"
id="t1">
<af:collectionDragSource actions="MOVE"
modelName="DnDOrganisations"/>
<af:collectionDropTarget actions="MOVE"
modelName="DnDOrganisations"
dropListener="#{treeBean.dragAndDrop}"/>
<f:facet name="nodeStamp">
<af:outputText value="#{node}" id="ot1"/>
</f:facet>
</af:tree>
Note both support the MOVE action, they both specify a matching modelName DnDOrganisations, and finally the dropListener maps to a backing bean method we'll define in a moment. It's essential the modelName's match including the case of the name, and we'll be referring to this in the dragAndDrop backing bean treeBean method in a moment.

3) In your adfc-config.xml file declare a bean treeBean of class view.TreeBean:


4) And create a Java class TreeBean in your view package within the ViewController project.
package view;

public class TreeBean {

}
The real work for drag and drop is done in the backing bean method. However in order for the code to work there are a couple of items we need to configure in the Model project:

5) Create an AppModuleImpl for the AM

6) Create a LeafOrgViewImpl for the VO

7) Create a LeafOrgViewRowImpl for the VO and ensure to include the accessors

8) In the AM expose the LeafOrgView VO one more time as its own node (not a child), and call the usage LeafOrgViewAll as follows:


9) Finally the dragAndDrop code is as follows. Note the code includes inline documentation comments that explains what is occurring:
package view;

import model.AppModuleImpl;
import model.LeafOrgViewImpl;
import model.LeafOrgViewRowImpl;
import model.ParentOrgViewRowImpl;
import oracle.adf.model.BindingContext;
import oracle.adf.view.rich.component.rich.data.RichTree;
import oracle.adf.view.rich.datatransfer.DataFlavor;
import oracle.adf.view.rich.datatransfer.Transferable;
import oracle.adf.view.rich.dnd.DnDAction;
import oracle.adf.view.rich.event.DropEvent;
import oracle.adfinternal.view.faces.model.binding.FacesCtrlHierNodeBinding;
import oracle.jbo.Key;
import oracle.jbo.uicli.binding.JUCtrlHierNodeBinding;
import org.apache.myfaces.trinidad.model.CollectionModel;
import org.apache.myfaces.trinidad.model.RowKeySet;

public class TreeBean {

public DnDAction dragAndDrop(DropEvent dropEvent) {
// The default action - do nothing
DnDAction result = DnDAction.NONE;

// Represents the object that was dropped
Transferable draggedTransferObject = dropEvent.getTransferable();

// The data in the draggedTransferObject "Transferrable" object is the row key for the dragged component.
// Note how the DnDOrganisations value in the call to getDataFlavor() matches the collectionDragSource
// and collectionDropTarget tags model attributes in our page. It's essential the strings exactly match.
DataFlavor<RowKeySet> draggedRowKeySetFlavor = DataFlavor.getDataFlavor(RowKeySet.class, "DnDOrganisations");
RowKeySet draggedRowKeySet = draggedTransferObject.getData(draggedRowKeySetFlavor);

if (draggedRowKeySet != null) {
// We grab the tree's data model, essentially the CollectionModel that stores the complete tree of nodes
CollectionModel treeModel = draggedTransferObject.getData(CollectionModel.class);

// Ask the collection model to set the current row/node to that of the transferrable object that was dropped
Object draggedKey = draggedRowKeySet.iterator().next();
treeModel.setRowKey(draggedKey);

// Grab that current row (thanks to the last statements work) and get the row's OrgId. It's essential the
// OrgId is one of the displayed attributes in the tree binding.
FacesCtrlHierNodeBinding draggedTreeNode = (FacesCtrlHierNodeBinding)treeModel.getRowData();
oracle.jbo.domain.Number draggedTreeNodeId = (oracle.jbo.domain.Number)draggedTreeNode.getAttribute("OrgId");

// The dropEvent carries the target/location's row key where the dropped organisations was dropped
Object serverRowKey = dropEvent.getDropSite();
RichTree richTree = (RichTree)dropEvent.getDropComponent();
// This time we use the tree itself to make it's current row that of the server row key (ie. the destination)
richTree.setRowKey(serverRowKey);
// And we retrieve that row's index
int rowIndex = richTree.getRowIndex();

// The rich tree based on the index allows us to retrieve that current row/organisation's OrgId
oracle.jbo.domain.Number targetNodeId = (oracle.jbo.domain.Number)((JUCtrlHierNodeBinding)richTree.getRowData(rowIndex)).getAttribute("OrgId");

// At this point we now have the OrgId of the dropped organisation (draggedTreeNodeId) and the OrgId of the
// organisation that is the target. From here we simply want to update the dropped organisations' ParentOrgId
// to the OrgId of the target. This is best done through the model layer.
//
// Normally this would be best done by fetching the appropriate iterator bindings and making the changes through
// the bindings. However in this case the tree doesn't expose any iterator for the leaf nodes, so we need to
// resort to retrieve the Model project's objects and do the work ourself.

// Retrieve the AM and then a handle on the LeafOrgViewAll - this gives us access to all rows regardless of
// where they exist in the hierarchy
AppModuleImpl am = (AppModuleImpl)BindingContext.getCurrent().getDefaultDataControl().getApplicationModule();
LeafOrgViewImpl leafOrgView = (LeafOrgViewImpl)am.getLeafOrgViewAll();

// Given the dragged organisation's OrgId, construct a key object, and then retrieve that row from the VO using
// the key
Object[] nodeObjectKey = new Object[] {draggedTreeNodeId};
Key nodeKey = new Key(nodeObjectKey);
LeafOrgViewRowImpl nodeRow = (LeafOrgViewRowImpl)leafOrgView.getRow(nodeKey);

// See below
boolean parentNode = nodeRow.getParentOrgId() == null;

// Finally update that organisaiton's ParentOrgId to that of the target organisation's OrgId
nodeRow.setParentOrgId(targetNodeId);

// And commit the changes – obviously this has side effects on any other uncommitted data, be careful
am.getDBTransaction().commit();

// If we've moved a parent node to become a leaf, we need to force the parent VO to requery itself to correctly
// reflect the data change. This is destructive on the current expand/collapsed state of the tree.
// I'm not overly sure of a solution for this; maybe a reader can suggest one.
if (parentNode) {
am.getParentOrgView1().clearCache();
am.getParentOrgView1().executeQuery();
}

// Indicate to the dragEvent that the operation was succesful and visually the move should occur in the tree
result = DnDAction.MOVE;
}
return result;
}
}
You'll note in the code I take pains to mention it's essential the OrgId is one of the displayed attributes for the tree. If you fail to supply this the routine has no OrgId attribute to fetch the OrgId value from.

This does pose a problem, because while during testing it's fine to show the OrgId and Name of the organisations in the tree, for production we might not want to show these meaningless internal ID numbers to the user. The simple fix for this is to return to the af:tree and update the af:outputText component who is responsible for what values to show for each node in the tree, changing the EL expression from #{code} to #{code.Name}:
<af:tree value="#{bindings.ParentOrgView1.treeModel}"
var="node"
selectionListener="#{bindings.ParentOrgView1.treeModel.makeCurrent}"
rowSelection="single"
id="t1">
<af:collectionDragSource actions="MOVE"
modelName="DnDOrganisations"/>
<af:collectionDropTarget actions="MOVE"
modelName="DnDOrganisations"
dropListener="#{treeBean.dragAndDrop}"/>
<f:facet name="nodeStamp">
<af:outputText value="#{node.Name}" id="ot1"/>
</f:facet>
</af:tree>
This ensures only the name attribute is displayed: